How to Install LEMP Stack (Nginx, MariaDB, PHP 8) on CentOS Stream 10
This is one of the most commonly used Software Stack for building your web applications and it is also known as LEMP (Linux, Nginx, MySQL/MariaDB, PHP/Perl/Python) Stack.
Install Nginx Web Server on CentOS Stream 10
First, we will start by installing the Nginx web server. To complete the installation, use the following command:
yum install nginx -yOutput:
[root@vps ~]# yum install nginx -y
CentOS Stream 10 - BaseOS                       8.0 MB/s | 6.3 MB     00:00
CentOS Stream 10 - AppStream                    2.9 MB/s | 2.7 MB     00:00
CentOS Stream 10 - Extras packages              8.7 kB/s | 3.8 kB     00:00
Dependencies resolved.
================================================================================
 Package                 Arch        Version               Repository      Size
================================================================================
Installing:
 nginx                   x86_64      2:1.26.2-4.el10       appstream       33 k
Installing dependencies:
 centos-logos-httpd      noarch      100.2-2.el10          appstream      855 k
 nginx-core              x86_64      2:1.26.2-4.el10       appstream      661 k
 nginx-filesystem        noarch      2:1.26.2-4.el10       appstream       12 k
 zlib-ng                 x86_64      2.2.3-1.el10          appstream       83 k

Transaction Summary
================================================================================
Install  5 Packages

Total download size: 1.6 M
Installed size: 3.4 M
Downloading Packages:
(1/5): nginx-1.26.2-4.el10.x86_64.rpm           510 kB/s |  33 kB     00:00
Once the installation is complete, enable Nginx (to start automatically upon system boot), start the webserver, and verify the status using the commands below.
systemctl start nginx
systemctl enable nginx
systemctl status nginx
Output:
[root@vps ~]# systemctl start nginx
systemctl enable nginx
systemctl status nginx
Created symlink '/etc/systemd/system/multi-user.target.wants/nginx.service' → '/usr/lib/systemd/system/nginx.service'.
● nginx.service - The nginx HTTP and reverse proxy server
     Loaded: loaded (/usr/lib/systemd/system/nginx.service; enabled; preset: di>
     Active: active (running) since Sat 2025-02-22 18:28:22 UTC; 393ms ago
 Invocation: ac400f260c0c4df6b0c47d72bf00e84f
   Main PID: 1593 (nginx)
      Tasks: 5 (limit: 23188)
     Memory: 4.4M (peak: 4.5M)
        CPU: 76ms
     CGroup: /system.slice/nginx.service
             ├─1593 "nginx: master process /usr/sbin/nginx"
             ├─1594 "nginx: worker process"
             ├─1595 "nginx: worker process"
             ├─1596 "nginx: worker process"
             └─1598 "nginx: worker process"

Feb 22 18:28:22 vps.server.com systemd[1]: Starting nginx.service - The nginx H>
Feb 22 18:28:22 vps.server.com nginx[1590]: nginx: the configuration file /etc/>
Feb 22 18:28:22 vps.server.com nginx[1590]: nginx: configuration file /etc/ngin>
Feb 22 18:28:22 vps.server.com systemd[1]: Started nginx.service - The nginx HT
To make your pages available to the public, you will have to edit your firewall rules to allow HTTP requests on your web server by using the following commands.
firewall-cmd --permanent --zone=public --add-service=http
firewall-cmd --permanent --zone=public --add-service=https
firewall-cmd --reload
Output:
[root@vps ~]# firewall-cmd --permanent --zone=public --add-service=http
firewall-cmd --permanent --zone=public --add-service=https
firewall-cmd --reload
success
success
success
Verify that the webserver is running and accessible by accessing your server’s IP address.
From your browser,
http://IP_address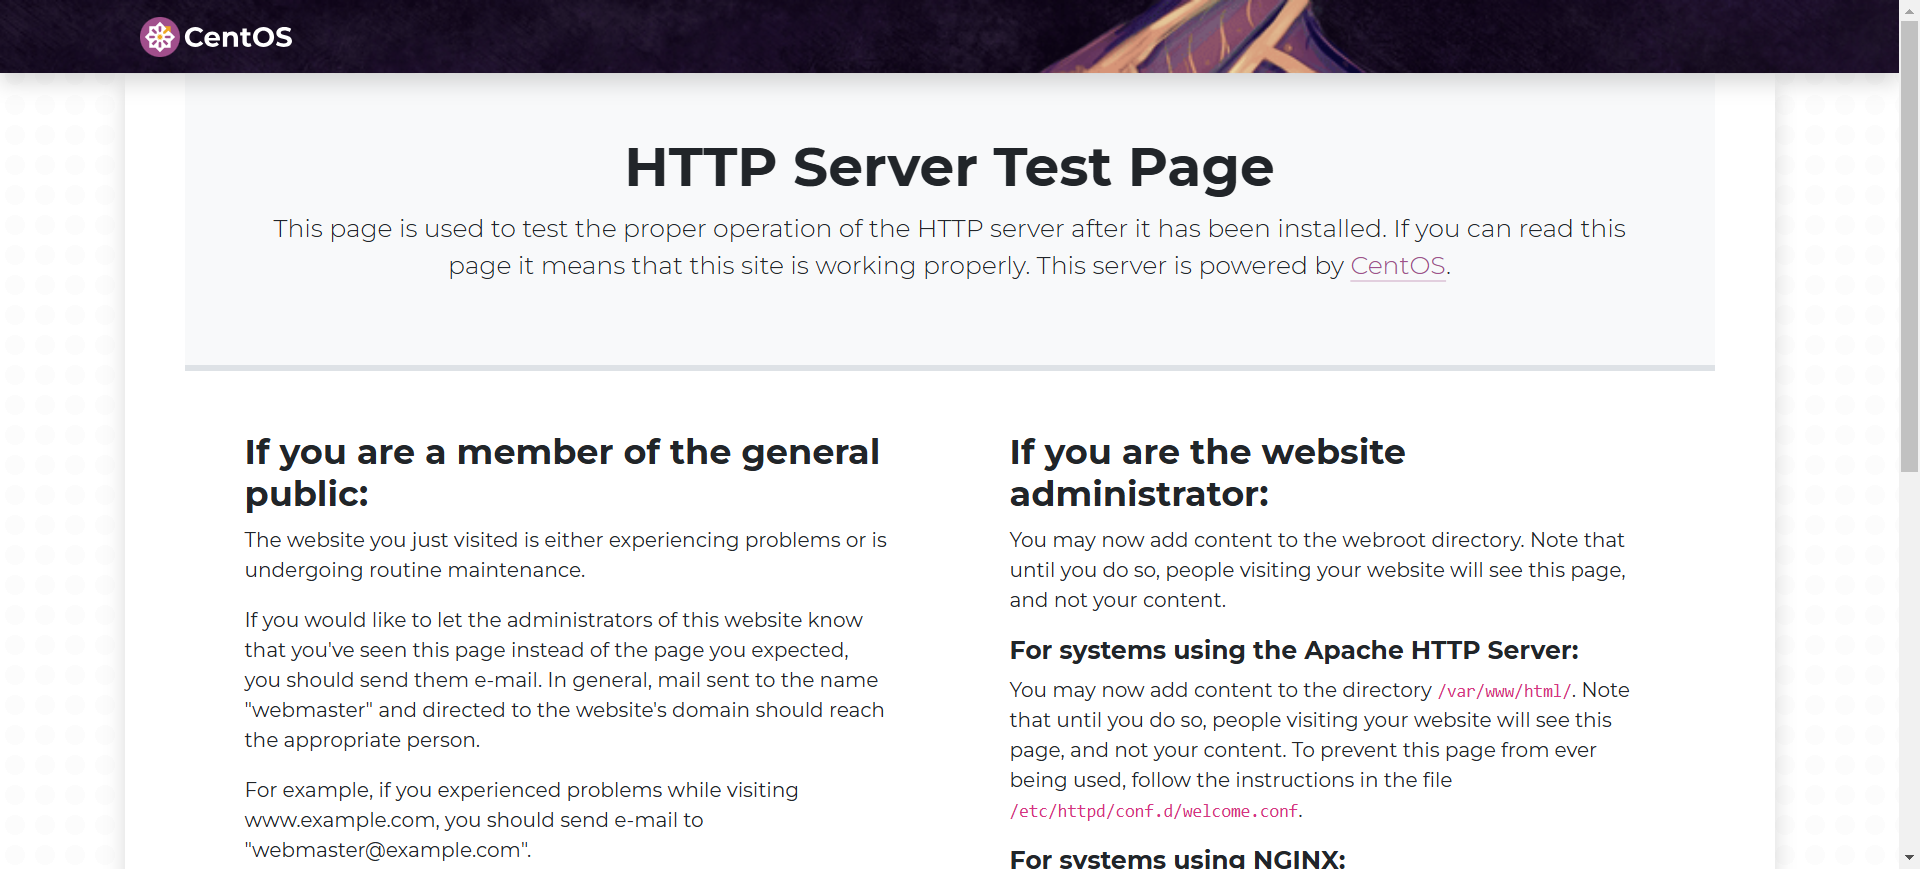
Replace the
IP_addresswith the actual IP of the server.
Install MariaDB Server
MariaDB is a popular database server. The installation is simple and requires just a few steps as shown.
yum install mariadb-server mariadb -yOutput:
[root@vps ~]# yum install mariadb-server mariadb -y
Last metadata expiration check: 0:00:23 ago on Mon 24 Feb 2025 02:18:35 PM UTC.
Dependencies resolved.
================================================================================
 Package                       Arch    Version                 Repository  Size
================================================================================
Installing:
 mariadb                       x86_64  3:10.11.11-1.el10       appstream  1.6 M
 mariadb-server                x86_64  3:10.11.11-1.el10       appstream  9.9 M
Installing dependencies:
 checkpolicy                   x86_64  3.8-1.el10              appstream  358 k
 libaio                        x86_64  0.3.111-22.el10         baseos      25 k
 mariadb-common                noarch  3:10.11.11-1.el10       appstream   32 k
Once the installation is complete, enable MariaDB (to start automatically upon system boot), start the MariaDB service and verify the status using the commands below.
systemctl start mariadb
systemctl enable mariadb
systemctl status mariadb
Output:
[root@vps ~]# systemctl start mariadb
systemctl enable mariadb
systemctl status mariadb
Created symlink '/etc/systemd/system/mysql.service' → '/usr/lib/systemd/system/m ariadb.service'.
Created symlink '/etc/systemd/system/mysqld.service' → '/usr/lib/systemd/system/ mariadb.service'.
Created symlink '/etc/systemd/system/multi-user.target.wants/mariadb.service' →  '/usr/lib/systemd/system/mariadb.service'.
● mariadb.service - MariaDB 10.11 database server
     Loaded: loaded (/usr/lib/systemd/system/mariadb.service; enabled; preset: >
     Active: active (running) since Sat 2025-02-22 18:33:47 UTC; 453ms ago
 Invocation: 068a20f0169c4494932099c45bcc3c4e
       Docs: man:mariadbd(8)
             https://mariadb.com/kb/en/library/systemd/
   Main PID: 2402 (mariadbd)
     Status: "Taking your SQL requests now..."
      Tasks: 11 (limit: 23188)
     Memory: 205.1M (peak: 231.5M)
        CPU: 874ms
     CGroup: /system.slice/mariadb.service
             └─2402 /usr/libexec/mariadbd --basedir=/usr

Feb 22 18:33:46 vps.server.com mariadb-prepare-db-dir[2350]: you need to be the>
Feb 22 18:33:46 vps.server.com mariadb-prepare-db-dir[2350]: After connecting y>
Feb 22 18:33:46 vps.server.com mariadb-prepare-db-dir[2350]: able to connect as>
Feb 22 18:33:46 vps.server.com mariadb-prepare-db-dir[2350]: See the MariaDB Kn>
Feb 22 18:33:46 vps.server.com mariadb-prepare-db-dir[2350]: Please report any >
Feb 22 18:33:46 vps.server.com mariadb-prepare-db-dir[2350]: The latest informa>
Feb 22 18:33:46 vps.server.com mariadb-prepare-db-dir[2350]: Consider joining M>
Feb 22 18:33:46 vps.server.com mariadb-prepare-db-dir[2350]: https://mariadb.or>
Feb 22 18:33:46 vps.server.com (mariadbd)[2402]: mariadb.service: Referenced bu>
lines 1-23
Finally, you will want to secure your MariaDB installation by issuing the following command.
mysql_secure_installationOutput:
[root@server ~]# mysql_secure_installation
Enter current password for root (enter for none):
Set root password? [Y/n] Y
Remove anonymous users? [Y/n] Y
Disallow root login remotely? [Y/n] Y
Remove test database and access to it? [Y/n] Y
Reload privilege tables now? [Y/n] Y
Install PHP
To Install PHP-FPM on CentOS Stream 10
yum install php php-mysqlnd php-fpm php-opcache php-gd php-xml php-mbstring -yOutput:
[root@vps ~]# yum install php php-mysqlnd php-fpm php-opcache php-gd php-xml php-mbstring -y
Last metadata expiration check: 0:06:58 ago on Sat 22 Feb 2025 06:29:45 PM UTC.
Dependencies resolved.
=================================================================================
 Package                Architecture Version               Repository       Size
=================================================================================
Installing:
 php                    x86_64       8.3.15-1.el10         appstream       8.4 k
 php-fpm                x86_64       8.3.15-1.el10         appstream       1.8 M
 php-gd                 x86_64       8.3.15-1.el10         appstream        40 k
 php-mbstring           x86_64       8.3.15-1.el10         appstream       516 k
 php-mysqlnd            x86_64       8.3.15-1.el10         appstream       131 k
 php-opcache            x86_64       8.3.15-1.el10         appstream       359 k
 php-xml                x86_64       8.3.15-1.el10         appstream       137 k
Installing dependencies:
 apr                    x86_64       1.7.5-2.el10          appstream       129 k
 apr-util               x86_64       1.6.3-21.el10         appstream        99 k
 apr-util-lmdb          x86_64       1.6.3-21.el10         appstream        15 k
 capstone               x86_64       5.0.1-6.el10          appstream       1.0 M
 fontconfig             x86_64       2.15.0-7.el10         appstream       280 k
 freetype               x86_64       2.13.2-8.el10         baseos          409 k
 gd                     x86_64       2.3.3-18.el10         appstream       134 k
 graphite2              x86_64       1.3.14-17.el10        baseos           96 k
Once the installation is complete, enable php-fpm (to start automatically upon system boot), start the php-fpm service, and verify the status using the commands below.
systemctl start php-fpm
systemctl enable php-fpm
systemctl status php-fpm
Output:
[root@vps ~]# systemctl start php-fpm
systemctl enable php-fpm
systemctl status php-fpm
Created symlink '/etc/systemd/system/multi-user.target.wants/php-fpm.service' → '/usr/lib/systemd/system/php-fpm.service'.
● php-fpm.service - The PHP FastCGI Process Manager
     Loaded: loaded (/usr/lib/systemd/system/php-fpm.service; enabled; preset: d>
     Active: active (running) since Sat 2025-02-22 18:39:06 UTC; 412ms ago
 Invocation: 511b9b08189e4021b46b6c089eebbbc4
   Main PID: 2922 (php-fpm)
     Status: "Ready to handle connections"
      Tasks: 6 (limit: 23188)
     Memory: 14.8M (peak: 15.1M)
        CPU: 101ms
     CGroup: /system.slice/php-fpm.service
             ├─2922 "php-fpm: master process (/etc/php-fpm.conf)"
             ├─2924 "php-fpm: pool www"
             ├─2925 "php-fpm: pool www"
             ├─2926 "php-fpm: pool www"
             ├─2927 "php-fpm: pool www"
             └─2928 "php-fpm: pool www"

Feb 22 18:39:06 vps.server.com systemd[1]: Starting php-fpm.service - The PHP Fa>
Feb 22 18:39:06 vps.server.com systemd[1]: Started php-fpm.service - The PHP Fas>
lines 1-19/19 (END)
By default, PHP-FPM runs as the apache user. Since we are using the Nginx web server, we need to change the following line.
vi /etc/php-fpm.d/www.confuser = apache
group = apacheChange them to
user = nginx
group = nginx
Once changed, need to reload php-fpm
systemctl reload php-fpmTest your PHP, by creating a simple info.php file with a phpinfo() function in it. The file should be placed in the directory root for your web server, which is /usr/share/nginx/html/info.php.
To create the file use:
echo "<?php phpinfo(); ?>" > /usr/share/nginx/html/info.phpRestart the Nginx and PHP-FPM.
systemctl restart nginx php-fpmNow again, access http://localhost/info.php or http://yourserver-ip-address/info.php. You should see a PHP info page.
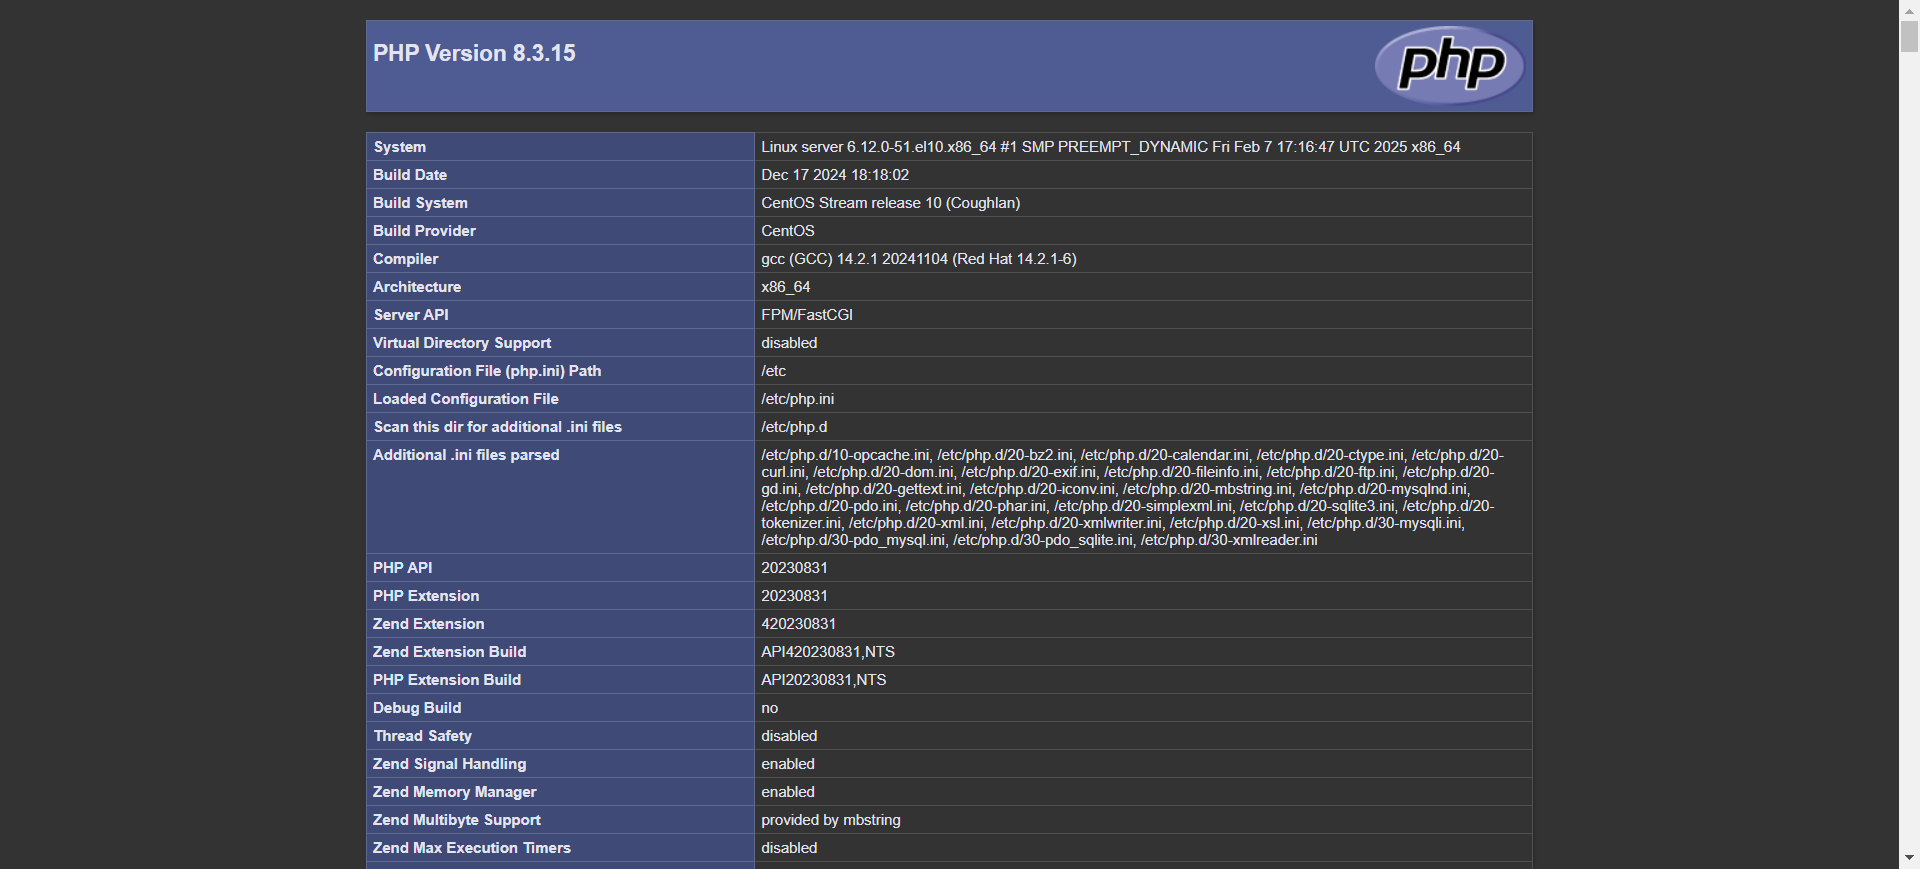
Once confirmed, we recommend removing the info.php as it could be a security issue later on.
CrownCloud - Get a SSD powered KVM VPS at $4.5/month!
Use the code WELCOME for 10% off!
1 GB RAM / 25 GB SSD / 1 CPU Core / 1 TB Bandwidth per month
Available Locations: LAX | MIA | ATL | FRA | AMS