How to Install Postal Mail Server on Rocky Linux 8
Postal is a complete and fully featured mail server for use by websites & web servers. Think Sendgrid, Mailgun, or Postmark but open source and ready for you to run on your servers. Postal is developed by Krystal to serve its mail processing requirements and we have since decided that it should be released as an open-source project for the community. In this article, we are going to learn how to install Postal Mail Server on Rocky Linux 8. So, let’s get started.
Checkout the Postal Mail Server Project Here.
Try this wiki on our VPS. Starting at just $5/month with 24x7 In-house customer support.
Pre-requisites :
-
A system with Rocky Linux 8 installed and running.
-
rootaccess to the system. -
Docker installed and running, for this, you can refer to one of our guides on installing the Docker on Rocky Linux 8.
- LAMP Stack installed and running, for this, you can refer to one of our guides on installing the LAMP Stack (Apache, MariaDB, and PHP).
Once you're all set, we'll proceed with Postal Mail Server installation and configuration.
Install Git, Curl & JSON data
There are a few system utilities that you need to have installed before you'll be able to run some of the Postal commands.
yum install git curl jq Download Postal Git Repository
Let's download Postal Git Repository using the below commands
git clone https://postalserver.io/start/install /opt/postal/install

ln -s /opt/postal/install/bin/postal /usr/bin/postal
Setup Database Connection using Docker
Postal requires a database engine to store all email and other essential configuration data. Let's setup using Docker.
Ensure that there's no other service running on port 3306.
docker run -d \
 --name postal-mariadb \
 -p 127.0.0.1:3306:3306 \
 --restart always \
 -e MARIADB_DATABASE=crowncloud \
 -e MARIADB_ROOT_PASSWORD=crowncloud_password \
 mariadb
The above commands will setup the database with user
crowncloud. We would suggest using a strong and long password.
Install RabbitMQ using Docker
RabbitMQ is responsible for dispatching messages between different processes. Let's setup using Docker.
docker run -d \
 --name postal-rabbitmq \
 -p 127.0.0.1:5672:5672 \
 --restart always \
 -e RABBITMQ_DEFAULT_USER=crowncloud \
 -e RABBITMQ_DEFAULT_PASS=crowncloud_password \
 -e RABBITMQ_DEFAULT_VHOST=crowncloud \
 rabbitmq:3.8
Install Postal Mail Server
Run the command below and replace dev1.domainhere.info with the actual hostname you want to access your Postal web interface at. Make sure you have set up this domain with your DNS provider before continuing.
postal bootstrap dev1.domainhere.infoConfigure and add all the appropriate values for your installation in postal.yaml
nano /opt/postal/config/postal.ymlChange values of the section DNS
dns:
 mx_records:
 - postal.dev1.domainhere.info
smtp_server_hostname: postal.dev1.domainhere.info
track_domain: postal.dev1.domainhere.info
spf_include: spf.postal.dev1.domainhere.info
return_path: rp.postal.dev1.domainhere.info
route_domain: routes.postal.dev1.domainhere.info
Replace
dev1.domainhere.infowith your actual domain name or IP Address. After that, save and exit.
Install Docker Compose using below commands
curl -L "https://github.com/docker/compose/releases/download/1.29.2/docker-compose-$(uname -s)-$(uname -m)" -o /usr/local/bin/docker-compose

chmod +x /usr/local/bin/docker-compose

ln -s /usr/local/bin/docker-compose /usr/bin/docker-compose
Initializing the database using the below command
postal initializeCreate a user account for Postal using the below command
postal make-user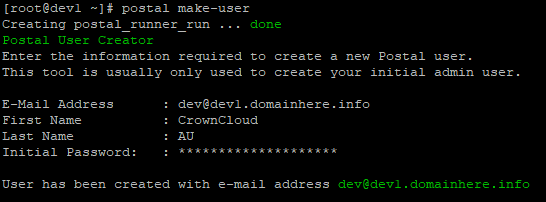
Let's start Postal Mail Server using the below command
postal startEnable Firewall:
firewall-cmd --zone=public --permanent --add-port 5000/tcp

firewall-cmd --permanent --add-service=http

firewall-cmd --permanent --add-service=https

firewall-cmd --reload
Install Caddy Server using Docker
To handle SSL termination and all web traffic, you'll need to configure a web proxy. You can use anything that takes your fancy here - Nginx, Apache, HAProxy, anything - but in this example, we're going to use Caddy.
Let's install Caddy Server using Docker
docker run -d \
--name postal-caddy \
--restart always \
--network host \
-v /opt/postal/config/Caddyfile:/etc/caddy/Caddyfile \
-v /opt/postal/caddy-data:/data \
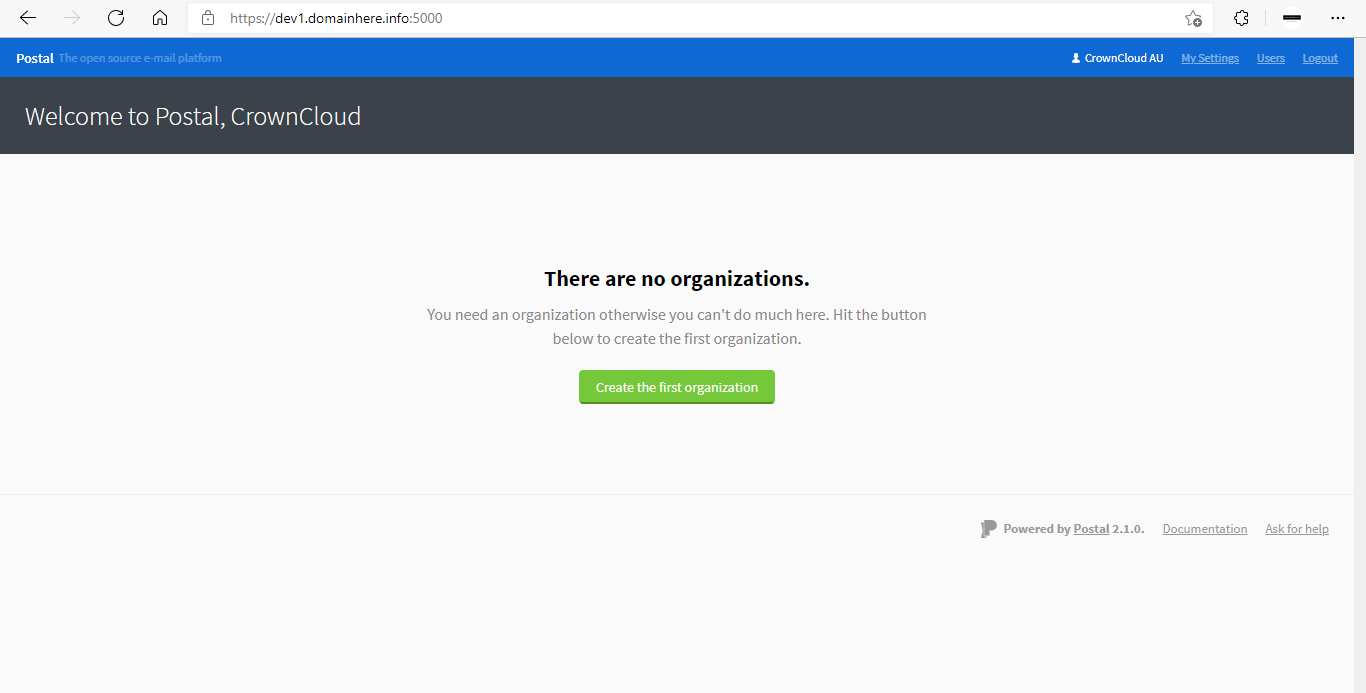
caddy Accessing and Managing Postal Mail Server
Now open the domain name from your browser, this will redirect you to configuring the final parts of the Postal Mail Server installation.
https://dev1.domainhere.info:5000Replace the
dev1.domainhere.infowith the actual IP or domain configured on the server.
Now you have Postal Mail Server on your server. Follow the below images for Postal layout:

Now you have successfully installed Postal Mail Server on Rocky Linux 8.
CrownCloud - Get a SSD powered KVM VPS at $4.5/month!
Use the code WELCOME for 10% off!
1 GB RAM / 25 GB SSD / 1 CPU Core / 1 TB Bandwidth per month
Available Locations: LAX | MIA | ATL | FRA | AMS