How to Install and Configure Apache Hadoop on Ubuntu 20.04
Apache Hadoop is an open source, Java-based software platform that manages data processing and storage for big data applications. Hadoop works by distributing large data sets and analytics jobs across nodes in a computing cluster, breaking them down into smaller workloads that can be run in parallel. Hadoop can process structured and unstructured data and scale up reliably from a single server to thousands of machines.
Update the system
Update the system packages with latest version with follwing command and reboot the system once updated.
apt-get update -y Installing Java
Apache Hadoop ia the application based on JAVA programming, need to install JAVA with following command.
apt-get install default-jdk default-jre -yOutput:
root@vps:~# apt-get install default-jdk default-jre -y
Reading package lists... Done
Building dependency tree... 50%
Building dependency tree
Reading state information... Done
The following additional packages will be installed:
    at-spi2-core ca-certificates-java default-jdk-headless
Verify the JAVA version once installation is done.
java -versionOutput:
root@vps:~# java -version
openjdk version "11.0.8" 2020-07-14
OpenJDK Runtime Environment (build 11.0.8+10-post-Ubuntu-0ubuntu120.04)
OpenJDK 64-Bit Server VM (build 11.0.8+10-post-Ubuntu-0ubuntu120.04, mixed mode, sharing)
root@vps:~#
Creating hadoop user
Create Hadoop User and Setup Passwordless SSH for Hadoop user run the follwing command to create Hadoop user.
adduser hadoopOutput:
root@vps:~# adduser hadoop
Adding user `hadoop' ...
Adding new group `hadoop' (1000) ...
Adding new user `hadoop' (1000) with group `hadoop' ...
Creating home directory `/home/hadoop' ...
Copying files from `/etc/skel' ...
New password:
Swith to Hadoop user once the user has been created.
su - hadoopOutput:
root@vps:~# su - hadoop
To run a command as administrator (user "root"), use "sudo <command>".
See "man sudo_root" for details.
hadoop@vps:~$
Run the following command to generate SSH key.
ssh-keygen -t rsaOutput:
hadoop@vps:~$ ssh-keygen -t rsa
Generating public/private rsa key pair.
Enter file in which to save the key (/home/hadoop/.ssh/id_rsa):
Created directory '/home/hadoop/.ssh'.
Enter passphrase (empty for no passphrase):
Enter same passphrase again:
Your identification has been saved in /home/hadoop/.ssh/id_rsa
Your public key has been saved in /home/hadoop/.ssh/id_rsa.pub
The key fingerprint is:
SHA256:pQ9ON9inRShNEhITlYqobPRk3x9EYNjgF+0buWkGzGg hadoop@vps.server.com
The key's randomart image is:
+---[RSA 3072]----+
|     .OB*o.      |
|    ...+o* .     |
|   . o+o+ = .    |
| ..o.Eo+ @ .     |
|o.+ o . S O o    |
|.o . . + @ =     |
|.       = +      |
|         .       |
|                 |
+----[SHA256]-----+
hadoop@vps:~$
You have to add the public key of your computer to the authorized_keys file of the computer also give the permission to the authorized_keys file.
cat ~/.ssh/id_rsa.pub >> ~/.ssh/authorized_keys
chmod 0600 ~/.ssh/authorized_keys
Verify the passwordless SSH connection with following command.
ssh Server's_IP_Address Install Hadoop
Switch hadoop user and download the latest version of Hadoop using follwing "wget" command.
su - hadoop

wget https://downloads.apache.org/hadoop/common/hadoop-3.2.1/hadoop-3.2.1.tar.gz
Output:
hadoop@vps:~$ wget https://downloads.apache.org/hadoop/common/hadoop-3.2.1/hadoop-3.2.1.tar.gz
--2020-10-05 14:40:38--  https://downloads.apache.org/hadoop/common/hadoop-3.2.1/hadoop-3.2.1.tar.gz
Resolving downloads.apache.org (downloads.apache.org)... 88.99.95.219, 2a01:4f8:10a:201a::2
Connecting to downloads.apache.org (downloads.apache.org)|88.99.95.219|:443... connected.
HTTP request sent, awaiting response... 200 OK
Length: 359196911 (343M) [application/x-gzip]
Saving to: ‘hadoop-3.2.1.tar.gz’

hadoop-3.2.1.tar.gz                       100%[=====================================================================================>] 342.56M  18.1MB/s    in 20s

2020-10-05 14:40:59 (17.5 MB/s) - ‘hadoop-3.2.1.tar.gz’ saved [359196911/359196911]
Extract the downloaded "tar" file with following command.
tar -xvzf hadoop-3.2.1.tar.gzNext, switch back to root user for the below commands. We will move the extracted files to a specific directory.
su root
cd /home/hadoop
mv hadoop-3.3.0 /usr/local/hadoop
/home/hadoop path will differ in case you have a different username.
Create the log directory to stotre the "Apache Hadoop" logs.
mkdir /usr/local/hadoop/logsChange the ownership of /usr/local/hadoop directory to hadoop and switch back to hadoop user.
chown -R hadoop:hadoop /usr/local/hadoop
su hadoop
Enter the edit mode to ".bashrc" and define the Hadoop environment variables by adding the following content to the end of the file.
vi ~/.bashrcAnd add the follwing configuration to the end of the file.
export HADOOP_HOME=/usr/local/hadoop
export HADOOP_INSTALL=$HADOOP_HOME
export HADOOP_MAPRED_HOME=$HADOOP_HOME
export HADOOP_COMMON_HOME=$HADOOP_HOME
export HADOOP_HDFS_HOME=$HADOOP_HOME
export YARN_HOME=$HADOOP_HOME
export HADOOP_COMMON_LIB_NATIVE_DIR=$HADOOP_HOME/lib/native
export PATH=$PATH:$HADOOP_HOME/sbin:$HADOOP_HOME/bin
export HADOOP_OPTS="-Djava.library.path=$HADOOP_HOME/lib/native"
Run the follwing command to activate the added environment variables.
source ~/.bashrc Configure Hadoop
Next, switch back to Hadoop user. If you are new to Hadoop and want to explore basic commands or test applications, you can configure Hadoop on a single node. Configure Java Environment Variables.
Next, you will need to define Java environment variables in hadoop-env.sh to configure YARN, HDFS, MapReduce, and Hadoop-related project settings.
To locate the correct path of Java by using the following command.
which javacOutput:
hadoop@vps:~$ which javac
/usr/bin/javac
hadoop@vps:~$
Next, find the OpenJDK directory with the following command.
readlink -f /usr/bin/javacOutput:
hadoop@vps:~$ readlink -f /usr/bin/javac
/usr/lib/jvm/java-11-openjdk-amd64/bin/javac
hadoop@vps:~$
Next, edit the hadoop-env.sh file and define the Java path.
vi $HADOOP_HOME/etc/hadoop/hadoop-env.shAnd add the follwing configuration to the end of the file.
export JAVA_HOME=/usr/lib/jvm/java-11-openjdk-amd64
export HADOOP_CLASSPATH+=" $HADOOP_HOME/lib/*.jar"
Need to download the Javax activation file by running the following command.
cd /usr/local/hadoop/lib
sudo wget https://jcenter.bintray.com/javax/activation/javax.activation-api/1.2.0/javax.activation-api-1.2.0.jar
Output:
hadoop@vps:/usr/local/hadoop/lib$ sudo wget https://jcenter.bintray.com/javax/activation/javax.activation-api/1.2.0/javax.activation-api-1.2.0.jar
--2020-10-05 14:55:51--  https://jcenter.bintray.com/javax/activation/javax.activation-api/1.2.0/javax.activation-api-1.2.0.jar
Resolving jcenter.bintray.com (jcenter.bintray.com)... 52.88.32.158, 35.161.162.245, 52.43.200.1, ...
Connecting to jcenter.bintray.com (jcenter.bintray.com)|52.88.32.158|:443... connected.
HTTP request sent, awaiting response... 200 OK
Length: 56674 (55K) [application/content-stream]
Saving to: ‘javax.activation-api-1.2.0.jar’

javax.activation-api-1.2.0.jar            100%[=====================================================================================>]  55.35K  --.-KB/s    in 0.05s

2020-10-05 14:55:51 (1021 KB/s) - ‘javax.activation-api-1.2.0.jar’ saved [56674/56674]
Next, Verify the hadoop version.
hadoop versionOutput:
hadoop@vps:/usr/local/hadoop/lib$ hadoop version
Hadoop 3.2.1
Source code repository https://gitbox.apache.org/repos/asf/hadoop.git -r b3cbbb467e22ea829b3808f4b7b01d07e0bf3842
Compiled by rohithsharmaks on 2019-09-10T15:56Z
Compiled with protoc 2.5.0
From source with checksum 776eaf9eee9c0ffc370bcbc1888737
This command was run using /usr/local/hadoop/share/hadoop/common/hadoop-common-3.2.1.jar
hadoop@vps:/usr/local/hadoop/lib$
Configure core-site.xml File
To set up Hadoop you need to specify the URL for your NameNode as following.
vi $HADOOP_HOME/etc/hadoop/core-site.xmlAnd add the follwing configuration to the end of the file.
<configuration>
     <property>
            <name>fs.default.name</name>
            <value>hdfs://0.0.0.0:9000</value>
            <description>The default file system URI</description>
     </property>
</configuration>
Configure hdfs-site.xml File
Need to define location for storing node metadata, fsimage file, and edit log file. Configure the file by defining the NameNode and DataNode storage directories.
Before configure create a directory for storing node metadata.
mkdir -p /home/hadoop/hdfs/{namenode,datanode}
chown -R hadoop:hadoop /home/hadoop/hdfs
Edit the hdfs-site.xml file and define the location of the directory as follows.
vi $HADOOP_HOME/etc/hadoop/hdfs-site.xmlAnd add the follwing configuration to the end of the file.
<configuration>
     <property>
            <name>dfs.replication</name>
            <value>1</value>
     </property>

     <property>
            <name>dfs.name.dir</name>
            <value>file:///home/hadoop/hdfs/namenode</value>
     </property>

     <property>
            <name>dfs.data.dir</name>
            <value>file:///home/hadoop/hdfs/datanode</value>
     </property>
</configuration>
Configure mapred-site.xml File
Use the following command to access the mapred-site.xml file and define MapReduce values.
vi $HADOOP_HOME/etc/hadoop/mapred-site.xmlAnd add the follwing configuration to the end of the file.
<configuration>
     <property>
            <name>mapreduce.framework.name</name>
            <value>yarn</value>
     </property>
</configuration>
Configure yarn-site.xml File
You would need to edit the yarn-site.xml file and define YARN related settings.
vi $HADOOP_HOME/etc/hadoop/yarn-site.xmlAnd add the follwing configuration to the end of the file.
<configuration>
     <property>
            <name>yarn.nodemanager.aux-services</name>
            <value>mapreduce_shuffle</value>
     </property>
</configuration>
Format HDFS NameNode
It is important to format the NameNode before starting Hadoop services for the first time.
hdfs namenode -formatOutput:
2020-10-05 15:12:51,795 INFO snapshot.SnapshotManager: Loaded config captureOpenFiles: false, skipCaptureAccessTimeOnlyChange: false, snapshotDiffAllowSnapRootDescendant: true, maxSnapshotLimit: 65536
2020-10-05 15:12:51,803 INFO snapshot.SnapshotManager: SkipList is disabled
2020-10-05 15:12:51,814 INFO util.GSet: Computing capacity for map cachedBlocks
2020-10-05 15:12:51,815 INFO util.GSet: VM type       = 64-bit
2020-10-05 15:12:51,815 INFO util.GSet: 0.25% max memory 498 MB = 1.2 MB
2020-10-05 15:12:51,815 INFO util.GSet: capacity      = 2^17 = 131072 entries
2020-10-05 15:12:51,848 INFO metrics.TopMetrics: NNTop conf: dfs.namenode.top.window.num.buckets = 10
2020-10-05 15:12:51,852 INFO metrics.TopMetrics: NNTop conf: dfs.namenode.top.num.users = 10
2020-10-05 15:12:51,852 INFO metrics.TopMetrics: NNTop conf: dfs.namenode.top.windows.minutes = 1,5,25
2020-10-05 15:12:51,863 INFO namenode.FSNamesystem: Retry cache on namenode is enabled
2020-10-05 15:12:51,863 INFO namenode.FSNamesystem: Retry cache will use 0.03 of total heap and retry cache entry expiry time is 600000 millis
2020-10-05 15:12:51,871 INFO util.GSet: Computing capacity for map NameNodeRetryCache
2020-10-05 15:12:51,872 INFO util.GSet: VM type       = 64-bit
2020-10-05 15:12:51,873 INFO util.GSet: 0.029999999329447746% max memory 498 MB = 153.0 KB
2020-10-05 15:12:51,874 INFO util.GSet: capacity      = 2^14 = 16384 entries
2020-10-05 15:12:51,937 INFO namenode.FSImage: Allocated new BlockPoolId: BP-809721395-127.0.1.1-1601910771923
2020-10-05 15:12:52,059 INFO common.Storage: Storage directory /home/hadoop/hdfs/namenode has been successfully formatted.
2020-10-05 15:12:52,161 INFO namenode.FSImageFormatProtobuf: Saving image file /home/hadoop/hdfs/namenode/current/fsimage.ckpt_0000000000000000000 using no compression
2020-10-05 15:12:52,447 INFO namenode.FSImageFormatProtobuf: Image file /home/hadoop/hdfs/namenode/current/fsimage.ckpt_0000000000000000000 of size 401 bytes saved in 0 seconds .
2020-10-05 15:12:52,486 INFO namenode.NNStorageRetentionManager: Going to retain 1 images with txid >= 0
2020-10-05 15:12:52,515 INFO namenode.FSImage: FSImageSaver clean checkpoint: txid=0 when meet shutdown.
2020-10-05 15:12:52,516 INFO namenode.NameNode: SHUTDOWN_MSG:
/************************************************************
SHUTDOWN_MSG: Shutting down NameNode at vps.server.com/127.0.1.1
************************************************************/
Start the Hadoop Cluster
First, start the NameNode and DataNode with the following command.
start-dfs.shOutput:
hadoop@vps:~/hdfs$ start-dfs.sh
Starting namenodes on [0.0.0.0]
0.0.0.0: Warning: Permanently added '0.0.0.0' (ECDSA) to the list of known hosts.
Starting datanodes
Starting secondary namenodes [vps.server.com]
vps.server.com: Warning: Permanently added 'vps.server.com' (ECDSA) to the list of known hosts.
Next, start the YARN resource and nodemanagers by typing.
start-yarn.shOutput:
hadoop@vps:~/hdfs$ start-yarn.sh
Starting resourcemanager
Starting nodemanagers
hadoop@vps:~/hdfs$
Verify if all the daemons are active and running as Java processes.
jpsOutput:
hadoop@vps:~/hdfs$ jps
63187 DataNode
64227 Jps
63699 ResourceManager
63868 NodeManager
63437 SecondaryNameNode
63038 NameNode
hadoop@vps:~/hdfs$
Access Hadoop Web Interface
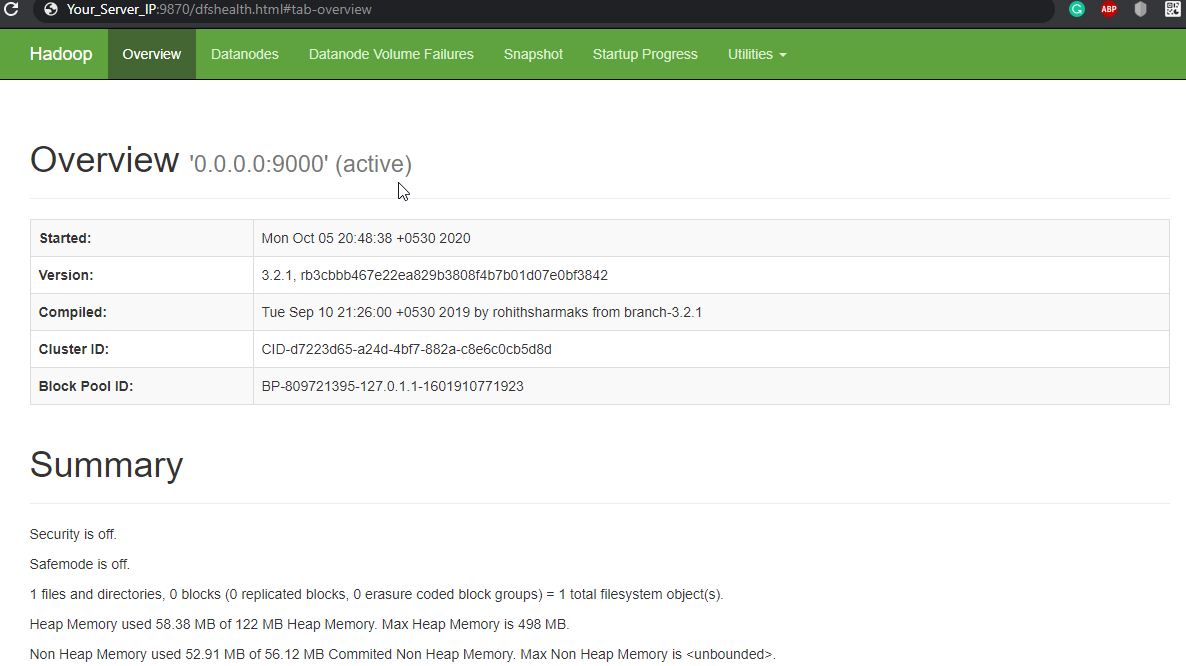
Navigate your localhost URL or IP to access Hadoop NameNode : http://your-server-ip:9870
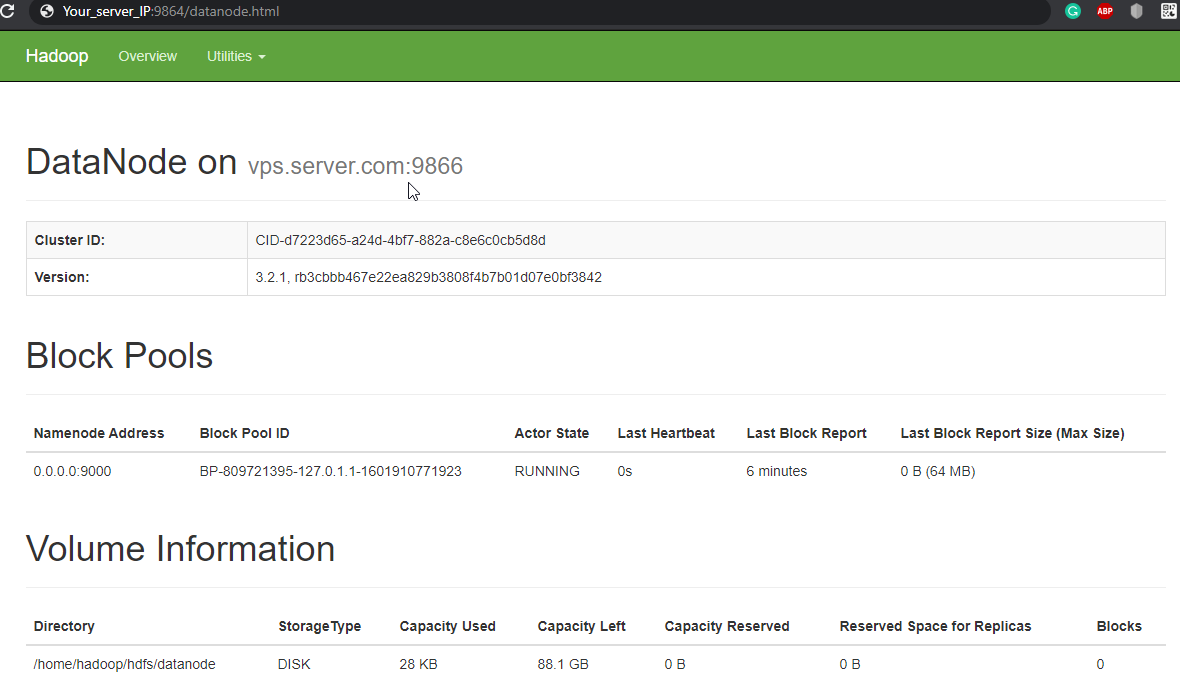
Navigate your localhost URL or IP to access individual DataNodes : http://your-server-ip:9864
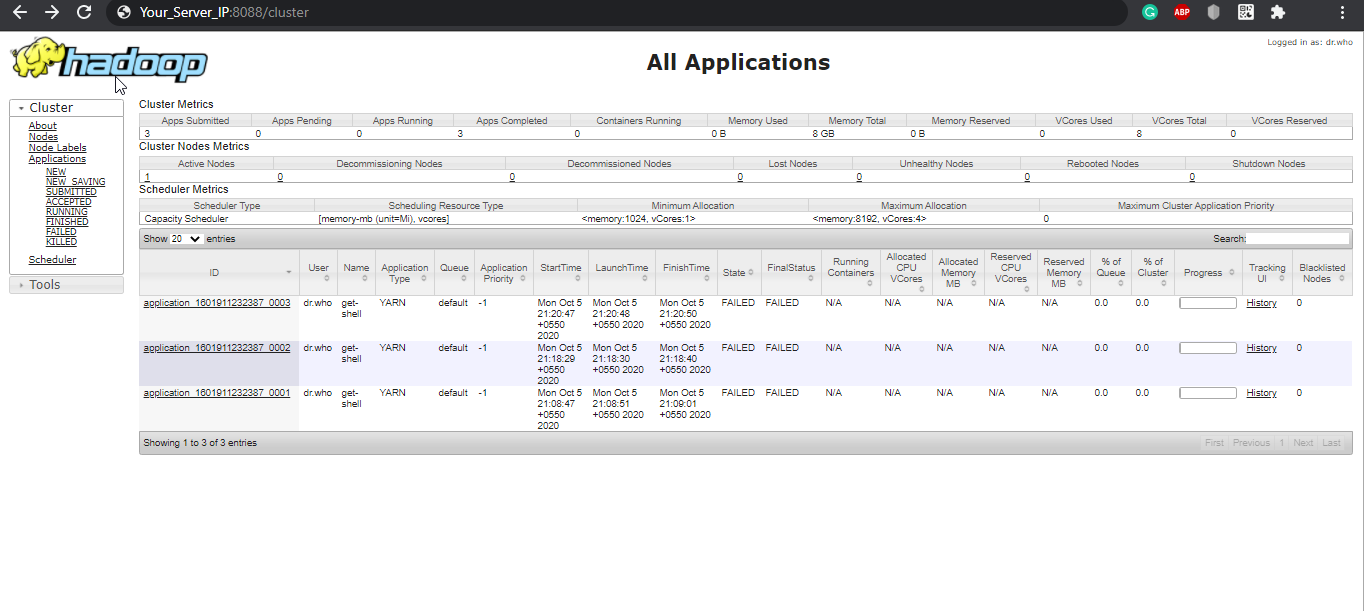
Navigate your localhost URL or IP to access the YARN Resource Manager: http://your-server-ip:8088
CrownCloud - Get a SSD powered KVM VPS at $4.5/month!
Use the code WELCOME for 10% off!
1 GB RAM / 25 GB SSD / 1 CPU Core / 1 TB Bandwidth per month
Available Locations: LAX | MIA | ATL | FRA | AMS