How to Install and Configure Apache Hadoop on Ubuntu 20.04
Apache Hadoop is an open-source, Java-based software platform that manages data processing and storage for big data applications. Hadoop works by distributing large data sets and analytics jobs across nodes in a computing cluster, breaking them down into smaller workloads that can be run in parallel. Hadoop can process structured and unstructured data and scale up reliably from a single server to thousands of machines.
Update the system
Update the system packages with the latest version with the following command and reboot the system once updated.
apt-get update -y Installing Java
Apache Hadoop is an application based on JAVA programming, need to install JAVA with the following command.
apt-get install default-jdk default-jre -yOutput:
root@crowncloud:~# apt-get install default-jdk default-jre -y
Reading package lists... Done
Building dependency tree... Done
Reading state information... Done
The following additional packages will be installed:
  alsa-topology-conf alsa-ucm-conf ca-certificates-java
  default-jdk-headless default-jre-headless
  fonts-dejavu-extra java-common libasound2 libasound2-data
  libatk-wrapper-java libatk-wrapper-java-jni libgif7
  libice-dev libpcsclite1 libpthread-stubs0-dev libsm-dev
  libx11-dev libxau-dev libxcb1-dev libxdmcp-dev libxt-dev
  openjdk-11-jdk openjdk-11-jdk-headless openjdk-11-jre
  openjdk-11-jre-headless x11proto-dev xorg-sgml-doctools
  xtrans-dev
Verify the JAVA version once the installation is done.
java -versionOutput:
root@crowncloud:~# java -version
openjdk version "11.0.12" 2021-07-20
OpenJDK Runtime Environment (build 11.0.12+7-Ubuntu-0ubuntu3)
OpenJDK 64-Bit Server VM (build 11.0.12+7-Ubuntu-0ubuntu3, mixed mode, sharing)
Creating Hadoop user
Create Hadoop User and Setup Passwordless SSH for Hadoop user run the following command to create Hadoop user.
adduser hadoopOutput:
root@crowncloud:~# adduser hadoop
Adding user `hadoop' ...
Adding new group `hadoop' (1001) ...
Adding new user `hadoop' (1001) with group `hadoop' ...
Creating home directory `/home/hadoop' ...
Copying files from `/etc/skel' ...
Switch to Hadoop user once the user has been created.
su - hadoopRun the following command to generate the SSH key.
ssh-keygen -t rsaOutput:
hadoop@crowncloud:~$ ssh-keygen -t rsa
Generating public/private rsa key pair.
Enter file in which to save the key (/home/hadoop/.ssh/id_rsa):
Created directory '/home/hadoop/.ssh'.
Enter passphrase (empty for no passphrase):
Enter same passphrase again:
Your identification has been saved in /home/hadoop/.ssh/id_rsa
Your public key has been saved in /home/hadoop/.ssh/id_rsa.pub
The key fingerprint is:
SHA256:ilKTSa7H1zQb9KpL/ydXNqcLOS3UGgn1/gn8ljTy6Lk hadoop@crowncloud.net
The key's randomart image is:
+---[RSA 3072]----+
|            .    |
|           . .   |
|    .   . .   .  |
|   o o . . ..+   |
|    *   S . ++oo |
|   + o + = . =@.=|
|  o + + +   *+.X.|
|   o o o  . +++  |
|      o....+ Eo. |
+----[SHA256]-----+
You have to add the public key of your computer to the authorized_keys file of the computer also give permission to the authorized_keys file.
cat ~/.ssh/id_rsa.pub >> ~/.ssh/authorized_keys
chmod 0600 ~/.ssh/authorized_keys
Verify the passwordless SSH connection with the following command.
ssh Server's_IP_Address Install Hadoop
Switch Hadoop user and download the latest version of Hadoop using the following "wget" command.
su - hadoop

wget https://downloads.apache.org/hadoop/common/hadoop-3.3.1/hadoop-3.3.1.tar.gz
Output:
hadoop@crowncloud:~$     wget https://downloads.apache.org/hadoop/common/hadoop-3.3.1/hadoop-3.3.1.tar.gz
--2021-09-13 12:35:33--  https://downloads.apache.org/hadoop/common/hadoop-3.3.1/hadoop-3.3.1.tar.gz
Resolving downloads.apache.org (downloads.apache.org)... 135.181.209.10, 88.99.95.219, 135.181.214.104, ...
Connecting to downloads.apache.org (downloads.apache.org)|135.181.209.10|:443... connected.
HTTP request sent, awaiting response... 200 OK
Length: 605187279 (577M) [application/x-gzip]
Saving to: ‘hadoop-3.3.1.tar.gz
Extract the downloaded "tar" file with the following command.
tar -xvzf hadoop-3.2.1.tar.gzNext, switch back to root user for the below commands. We will move the extracted files to a specific directory.
  su root
  cd /home/hadoop
  mv hadoop-3.3.0 /usr/local/hadoop
/home/hadoop path will differ in case you have a different username.
Create the log directory to store the "Apache Hadoop" logs.
mkdir /usr/local/hadoop/logsChange the ownership of /usr/local/hadoop directory to Hadoop and switch back to Hadoop user.
  chown -R hadoop:hadoop /usr/local/hadoop
  su hadoop
Enter the edit mode to ".bashrc" and define the Hadoop environment variables by adding the following content to the end of the file.
vi ~/.bashrcAnd add the following configuration to the end of the file.
export HADOOP_HOME=/usr/local/hadoop
export HADOOP_INSTALL=$HADOOP_HOME
export HADOOP_MAPRED_HOME=$HADOOP_HOME
export HADOOP_COMMON_HOME=$HADOOP_HOME
export HADOOP_HDFS_HOME=$HADOOP_HOME
export YARN_HOME=$HADOOP_HOME
export HADOOP_COMMON_LIB_NATIVE_DIR=$HADOOP_HOME/lib/native
export PATH=$PATH:$HADOOP_HOME/sbin:$HADOOP_HOME/bin
export HADOOP_OPTS="-Djava.library.path=$HADOOP_HOME/lib/native"
Run the following command to activate the added environment variables.
source ~/.bashrc Configure Hadoop
Next, switch back to Hadoop user. If you are new to Hadoop and want to explore basic commands or test applications, you can configure Hadoop on a single node. Configure Java Environment Variables.
Next, you will need to define Java environment variables in Hadoop-env.sh to configure YARN, HDFS, MapReduce, and Hadoop-related project settings.
To locate the correct path of Java by using the following command.
which javacOutput:
hadoop@crowncloud:~$ which javac
/usr/bin/javac
Next, find the OpenJDK directory with the following command.
readlink -f /usr/bin/javacOutput:
hadoop@crowncloud:~$ readlink -f /usr/bin/javac
/usr/lib/jvm/java-11-openjdk-amd64/bin/javac
Next, edit the hadoop-env.sh file and define the Java path.
vi $HADOOP_HOME/etc/hadoop/hadoop-env.shAnd add the following configuration to the end of the file.
export JAVA_HOME=/usr/lib/jvm/java-11-openjdk-amd64
export HADOOP_CLASSPATH+=" $HADOOP_HOME/lib/*.jar"
Need to download the Javax activation file by running the following command.
cd /usr/local/hadoop/lib
sudo wget https://jcenter.bintray.com/javax/activation/javax.activation-api/1.2.0/javax.activation-api-1.2.0.jar
Output:
root@crowncloud:/usr/local/hadoop/lib#  sudo wget https://jcenter.bintray.com/javax/activation/javax.activation-api/1.2.0/javax.activation-api-1.2.0.jar
--2021-09-13 12:56:33--  https://jcenter.bintray.com/javax/activation/javax.activation-api/1.2.0/javax.activation-api-1.2.0.jar
Resolving jcenter.bintray.com (jcenter.bintray.com)... 34.95.74.180
Connecting to jcenter.bintray.com (jcenter.bintray.com)|34.95.74.180|:443... connected.
HTTP request sent, awaiting response... 200 OK
Length: 56674 (55K) [application/java-archive]
Saving to: ‘javax.activation-api-1.2.0.jar’

javax.activatio 100%[======>]  55.35K  --.-KB/s    in 0.002s

2021-09-13 12:56:33 (23.1 MB/s) - ‘javax.activation-api-1.2.0.jar’ saved [56674/56674]
Next, Verify the Hadoop version.
hadoop versionOutput:
root@crowncloud:/usr/local/hadoop/lib# hadoop version
Hadoop 3.3.1
Source code repository https://github.com/apache/hadoop.git -r a3b9c37a397ad4188041dd80621bdeefc46885f2
Compiled by ubuntu on 2021-06-15T05:13Z
Compiled with protoc 3.7.1
From source with checksum 88a4ddb2299aca054416d6b7f81ca55
This command was run using /usr/local/hadoop/share/hadoop/common/hadoop-common-3.3.1.jar
Configure core-site.xml File
To set up Hadoop you need to specify the URL for your NameNode as following.
vi $HADOOP_HOME/etc/hadoop/core-site.xmlAnd add the following configuration to the end of the file.
<configuration>
   <property>
      <name>fs.default.name</name>
      <value>hdfs://0.0.0.0:9000</value>
      <description>The default file system URI</description>
   </property>
</configuration>
Configure hdfs-site.xml File
Need to define a location for storing node metadata, image file, and edit log file. Configure the file by defining the NameNode and DataNode storage directories.
Before configure create a directory for storing node metadata.
mkdir -p /home/hadoop/hdfs/{namenode,datanode}
chown -R hadoop:hadoop /home/hadoop/hdfs
Edit the hdfs-site.xml file and define the location of the directory as follows.
vi $HADOOP_HOME/etc/hadoop/hdfs-site.xmlAnd add the following configuration to the end of the file.
<configuration>
   <property>
      <name>dfs.replication</name>
      <value>1</value>
   </property>

   <property>
      <name>dfs.name.dir</name>
      <value>file:///home/hadoop/hdfs/namenode</value>
   </property>

   <property>
      <name>dfs.data.dir</name>
      <value>file:///home/hadoop/hdfs/datanode</value>
   </property>
</configuration>
Configure mapred-site.xml File
Use the following command to access the mapred-site.xml file and define MapReduce values.
vi $HADOOP_HOME/etc/hadoop/mapred-site.xmlAnd add the following configuration to the end of the file.
<configuration>
   <property>
      <name>mapreduce.framework.name</name>
      <value>yarn</value>
   </property>
</configuration>
Configure yarn-site.xml File
You would need to edit the yarn-site.xml file and define YARN related settings.
vi $HADOOP_HOME/etc/hadoop/yarn-site.xmlAnd add the following configuration to the end of the file.
<configuration>
   <property>
      <name>yarn.nodemanager.aux-services</name>
      <value>mapreduce_shuffle</value>
   </property>
</configuration>
Format HDFS NameNode
It is important to format the NameNode before starting Hadoop services for the first time.
hdfs namenode -formatOutput:
root@crowncloud:/usr/local/hadoop/lib# hdfs namenode -format
2021-09-13 13:05:08,749 INFO namenode.NameNode: STARTUP_MSG:
/************************************************************
STARTUP_MSG: Starting NameNode
STARTUP_MSG:   host = crowncloud.net/127.0.1.1
STARTUP_MSG:   args = [-format]
STARTUP_MSG:   version = 3.3.1
STARTUP_MSG:   classpath = /usr/local/hadoop/etc/hadoop:/usr/local/hadoop/share/hadoop/common/lib/commons-net-3.6.jar:/usr/local/hadoop/
share/hadoop/common/lib/hadoop-annotations-3.3.1.jar:/usr/local/hadoop/share/hadoop/common/lib/netty-3.10.6.Final.jar:/usr/local/hadoop/
share/hadoop/common/lib/jetty-http-9.4.40.v20210413.jar:/usr/local/hadoop/share/hadoop/common/lib/kerb-identity-1.0.1.jar:/usr/local/
hadoop/share/hadoop/common/lib/jersey-server-1.19.jar:/usr/local/hadoop/share/hadoop/common/lib/json-smart-2.4.2.jar:/usr/local/hadoop/share/hadoop/common/lib/curator-framework-4.2.0.jar:/usr/local/hadoop/share/hadoop/common/lib/htrace-core4-4.1.0-incubating.jar:/usr/local/hadoop/share/hadoop/common/lib/commons-codec-1.11.jar:/usr/local/hadoop/share/hadoop/common/lib/kerby-config-1.0.1.jar:/usr/local/hadoop/share/hadoop/common/lib/woodstox-core-5.3.0.jar:/usr/local/hadoop/share/hadoop/common/lib/j2objc-annotations-1.1.jar:/usr/local/hadoop/share/hadoop/common/lib/jetty-security-9.4.40.v20210413.jar:/usr/local/hadoop/share/hadoop/common/lib/re2j-1.1.jar:/usr/local/hadoop/share/hadoop/common/lib/accessors-smart-2.4.2.jar:/usr/local/hadoop/share/hadoop/common/lib/commons-io-2.8.0.jar:/usr/local/hadoop/share/hadoop/common/lib/kerb-simplekdc-1.0.1.jar:/usr/local/hadoop/share/hadoop/common/lib/failureaccess-1.0.jar:/usr/local/hadoop/share/hadoop/common/lib/kerb-admin-1.0.1.jar:/usr/local/hadoop/share/hadoop/common/lib/snappy-java-1.1.8.2.jar:/usr/local/hadoop/share/hadoop/common/lib/gson-2.2.4.jar:/usr/local/hadoop/share/hadoop/common/lib/commons-compress-1.19.jar:/usr/local/hadoop/share/hadoop/common/lib/commons-beanutils-1.9.4.jar:/usr/local/hadoop/share/hadoop/common/lib/paranamer-2.3.jar:/usr/local/hadoop/share/hadoop/common/lib/jcip-annotations-1.0-1.jar:/usr/local/hadoop/share/hadoop/common/lib/sl
Start the Hadoop Cluster
First, start the NameNode and DataNode with the following command.
start-dfs.shOutput:
hadoop@crowncloud:/usr/local/hadoop$ start-dfs.sh
Starting namenodes on [0.0.0.0]
0.0.0.0: /usr/local/hadoop/bin/../libexec/hadoop-functions.sh: line 1848: /tmp/hadoop-hadoop-namenode.pid: Permission denied
0.0.0.0:
Next, start the YARN resource and node managers by typing.
start-yarn.shOutput:
hadoop@crowncloud:/usr/local/hadoop$ start-yarn.sh
Starting resourcemanager
Starting nodemanagers
Verify if all the daemons are active and running as Java processes.
jpsOutput:
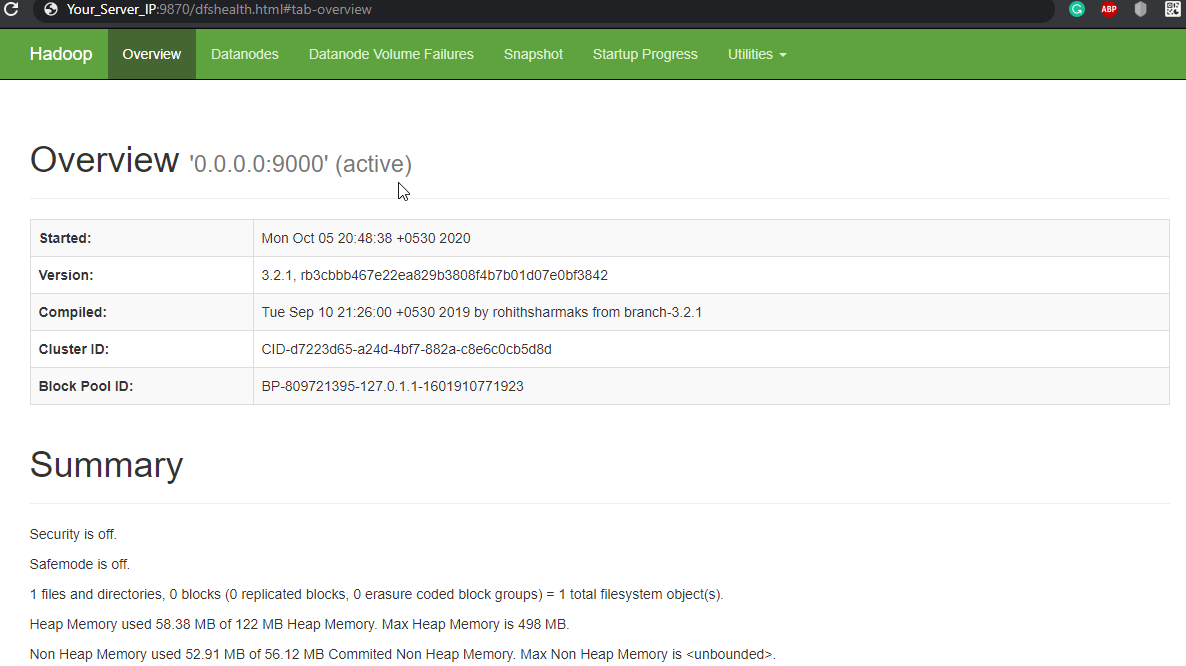
Access Hadoop Web Interface
Navigate your localhost URL or IP to access Hadoop NameNode: http://your-server-ip:9870
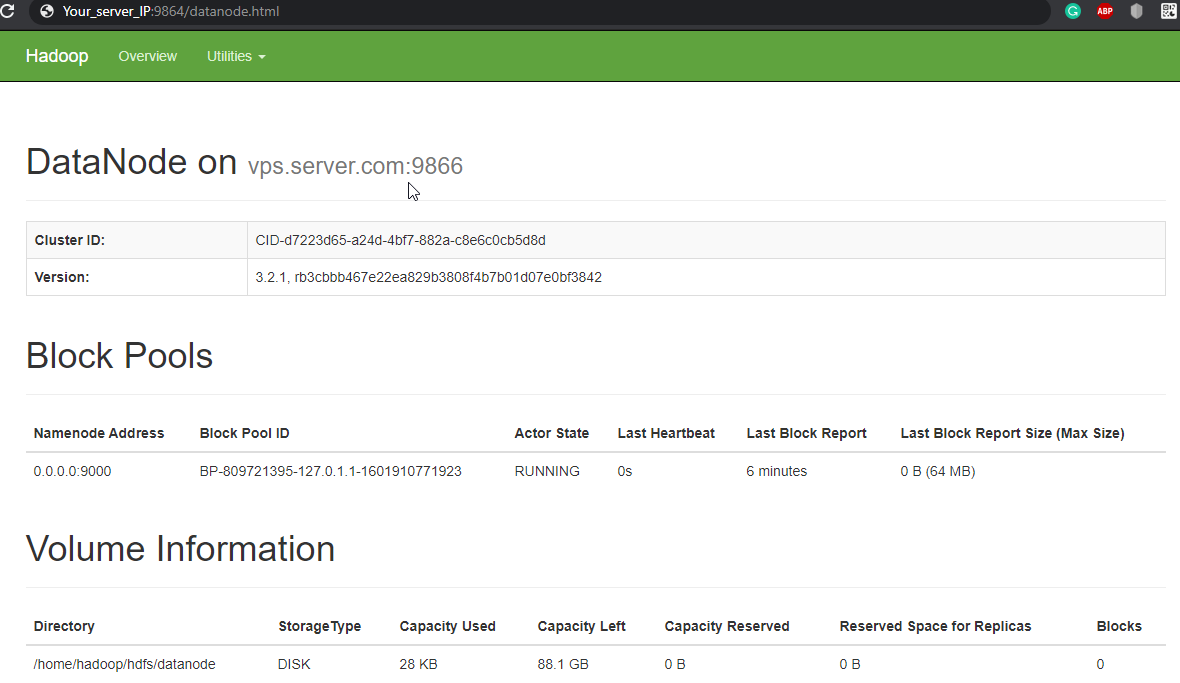
Navigate your localhost URL or IP to access individual DataNodes: http://your-server-ip:9864
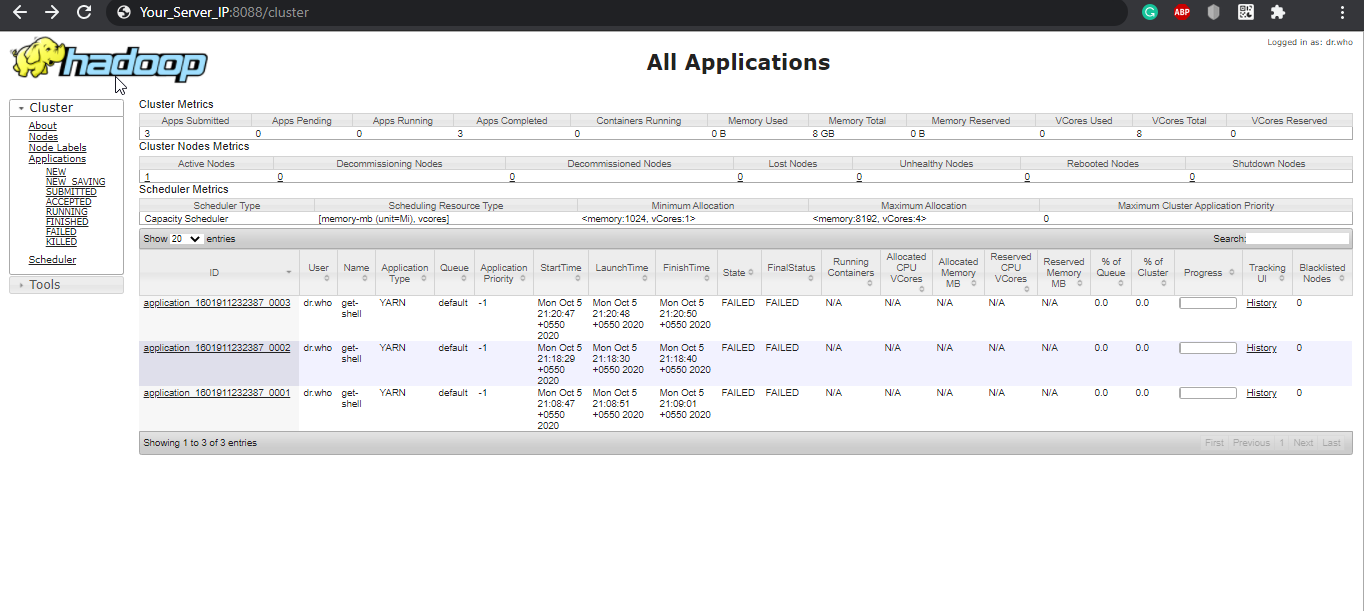
Navigate your localhost URL or IP to access the YARN Resource Manager: http://your-server-ip:8088
CrownCloud - Get a SSD powered KVM VPS at $4.5/month!
Use the code WELCOME for 10% off!
1 GB RAM / 25 GB SSD / 1 CPU Core / 1 TB Bandwidth per month
Available Locations: LAX | MIA | ATL | FRA | AMS