How to Install and Configure OwnCloud on Rocky Linux 8
OwnCloud is an open source project that can be installed on your server to securely store and access files. Also allows you to share and collaborate contents that lets teams work on data easily from anywhere, on any device.
Find out more about ownCloud.
Prerequisites
Before we begin with installing ownCloud, you would need either a LAMP or LEMP Stack installed and running on your server or home computer.
To install and configure LAMP Stack, Click here.
To install and configure LEMP Stack, Click here.
Updating your system
Before we begin, we will make sure our system is upto date and install any pending updated
yum update -y Downloading OwnCloud
You can download the latest version of ownCloud by checking their downloads section.
Download ownCloud and extract it using the following command.
cd /tmp

wget https://download.owncloud.com/server/stable/owncloud-complete-latest.tar.bz2
Now extract the owcloud tar file to /var/www/html/ directory.
yum install bzip2

tar -xvf owncloud-complete-latest.tar.bz2 -C /var/www/html/
Set the permissions of owncloud directory so it can be accessible.
chown apache:apache -R /var/www/html/owncloud/

chmod -R 755 /var/www/html/owncloud
Create a new MySQL database.
mysql -u root -p

mysql> CREATE DATABASE ownclouddb;

mysql> GRANT ALL PRIVILEGES ON ownclouddb.* TO 'ownclouduser'@'localhost' IDENTIFIED BY 'YOUR PASSWORD' WITH GRANT
OPTION;

mysql> FLUSH PRIVILEGES;

mysql> exit;
Note : Replace
YOUR-PASSWORDwith the actual password
Output:
[root@server tmp]# mysql -u root -p
Enter password:
Welcome to the MariaDB monitor.  Commands end with ; or \g.
Your MariaDB connection id is 14
Server version: 10.3.28-MariaDB MariaDB Server

Copyright (c) 2000, 2018, Oracle, MariaDB Corporation Ab and others.

Type 'help;' or '\h' for help. Type '\c' to clear the current input statement.

MariaDB [(none)]> CREATE DATABASE ownclouddb;
Query OK, 1 row affected (0.004 sec)

MariaDB [(none)]> GRANT ALL PRIVILEGES ON ownclouddata.* TO 'ownclouduser'@'localhost' IDENTIFIED BY 'enter your password' WITH GRANT
    -> OPTION;
Query OK, 0 rows affected (0.004 sec)

MariaDB [(none)]> FLUSH PRIVILEGES;
Query OK, 0 rows affected (0.006 sec)

MariaDB [(none)]> exit;
Aborted
[root@server tmp]#
Configuring Firewall and SELinux
Open the port in firewall using following command.
firewall-cmd --zone=public --add-port=80/tcp --permanent
firewall-cmd --reload
Next, we'll update the SELinux configuration file.
Set SELinux mode to permissive by running the following command.
setenforce 0Open the file using your preferred editor,
vi /etc/selinux/configAnd update the settings as shown below,
# This file controls the state of SELinux on the system.
# SELINUX= can take one of these three values:
# enforcing - SELinux security policy is enforced.
# permissive - SELinux prints warnings instead of enforcing.
# disabled - No SELinux policy is loaded.
  SELINUX=permissive
# SELINUXTYPE= can take one of these two values:
# targeted - Targeted processes are protected,
# mls - Multi Level Security protection.
  SELINUXTYPE=targeted
If SELinux is enabled and running, execute the command below to allow the Apache webserver to write to Owncloud’s directory.
setsebool -P httpd_unified 1Now type your IP address in the URL to complete the ownCloud installation.
http://server_IP/owncloudYou will have to create admin account for ownCloud
Enter the username and password which you want to set.
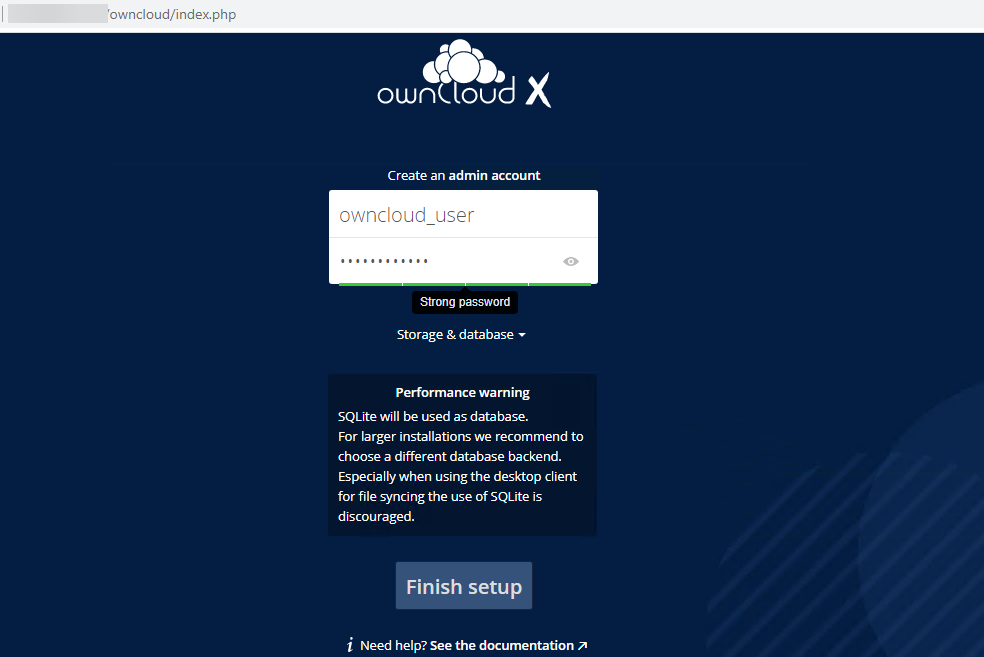
Click on the Finish setup button.
CrownCloud - Get a SSD powered KVM VPS at $4.5/month!
Use the code WELCOME for 10% off!
1 GB RAM / 25 GB SSD / 1 CPU Core / 1 TB Bandwidth per month
Available Locations: LAX | MIA | ATL | FRA | AMS