How to Sync Time in CentOS Stream 9 using Chrony
Chrony is an implementation of the Network Time Protocol. It is used to synchronize the system clock from different NTP servers, reference clocks, or via manual input. It runs on Unix-like operating systems and is released under the GNU GPL v2.
Install Chrony
To Install Chrony use the following command:
yum install chrony -y Testing Chrony
Let's sync the time of our centOS server with the remote NTP server manually. You can get a list of NTP Servers from ntppool.org -- It is recommended to select an NTP server located closest to your server location.
For Europe,
chronyd -q 'server 0.europe.pool.ntp.org iburst'For North America,
chronyd -q 'server 0.north-america.pool.ntp.org iburst' Start and Enable Chronyd Service
Start the chronyd service and setup chronyd to automatically start on reboots using the following commands,
systemctl start chronyd

systemctl enable chronyd
Verify and Track Chrony Synchronization
Check that your system’s time is synchronized using chrony now.
chronyc tracking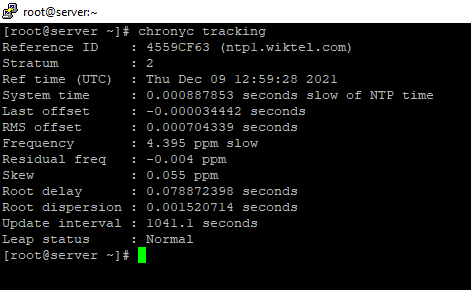
From the above output,
- Reference ID is the ID/name of the server with which your system’s time is currently synced.
- Stratum is used here to indicate the number of hops away from the reference clock we are, or simply, the number of hops between us and the remote server we are connected to
Check Chrony Sources
List time sources used by chronyd.
chronyc sources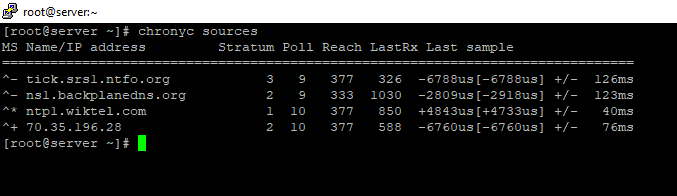
Check Chrony Source Statistics
List drift speed and offset estimation of each source that is used by chronyd.
chronyc sourcestats -v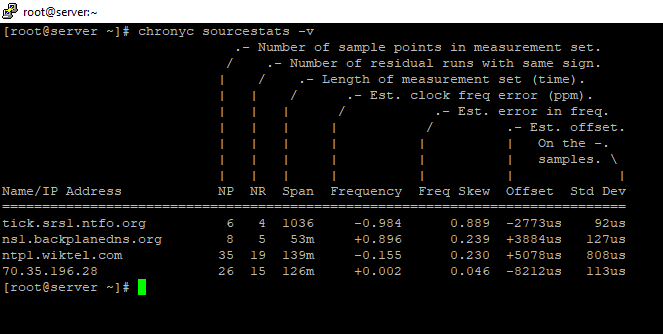
You have now successfully synced your CentOS Stream 9 times with Chrony.
CrownCloud - Get a SSD powered KVM VPS at $4.5/month!
Use the code WELCOME for 10% off!
1 GB RAM / 25 GB SSD / 1 CPU Core / 1 TB Bandwidth per month
Available Locations: LAX | MIA | ATL | FRA | AMS