Configure Additional IPv4 using NetPlan on Ubuntu 18.04 and Above
From Ubuntu 18.04, a switch was made to configure network using NetPlan written in YAML. In this article, we will learn how to configure additional IPs in newer versions of Ubuntu, such as Ubuntu 18.04, 20.04, 22.04 and so on using Netplan.
If you're looking to configure static IPv4 network, click on here.
Find the Additional IPv4 assigned to you
To find out the IPv4 Address assigned to you, login to CrownPanel and navigate to Manage Network tab.
A side note on this, YAML is strict on indentation so we will use 2 spaces through out the guide.
We will have 2 cases while configuring Additional IPv4.
-
All the IPv4 belong to one subnet.
Example: 23.228.232.82/24, 23.228.232.83/24 and 23.228.232.84/24 belong to a single subnet.
-
IPv4 belong to a different subnets.
Example: 23.228.232.65/24 and 45.128.156.7/24 belong to a different subnet.
In Case 1, we will configure additional IPv4 belonging to one subnet
Edit the default configuration file,
nano /etc/netplan/01-netcfg.yamlMake the following changes to it.
network:
  version: 2
  renderer: networkd
  ethernets:
    ens3:
      dhcp4: false
      addresses:
        - 23.228.232.82/27
        - 23.228.232.83/27
        - 23.228.232.84/27
      nameservers:
        addresses:
          - 8.8.8.8
          - 8.8.4.4
      routes:
        - to: default
          via: 23.228.232.65
A detailed explanation is given below on where you can find the Prefix and Gateway IPs.
In Case 2, we will configure additional IPv4 which belongs to different subnets
We will not modify the default configuration file BUT we will create a new configuration file for each IP that belongs to a different subnet.
We will create a new network configuration file,
nano /etc/netplan/02-netcfg.yamlAdd the following content into it
network:
  version: 2
  renderer: networkd
  ethernets:
    ens3:
      dhcp4: false
      addresses:
        - 45.128.156.7/24
      nameservers:
        addresses:
          - 8.8.8.8
          - 8.8.4.4
      routes:
        - to: default
          via: 45.128.156.1
You can create more number of network configuration files depending on the subnets you have.
What's Addresses, Nameservers and Routes
Under addresses, we've added the Main IP of the server followed by it's prefix.
If your netmask is "255.255.255.0", then use /24 prefix.
You can find more info on how to use the right prefix here.
In routes, we've put the gateway IP of the IP block.
This can be found in the "Manage Network" page in CrownPanel.
For nameservers, we are using google's public DNS.
8.8.8.8
8.8.4.4
You can also try CloudFlare's public DNS as well.
1.1.1.1After the IPs have been added to the configuration file(s), Save and exit the config.
Run the following command to test the changes.
netplan tryIf the configuration fails, changes will be reverted in 120 seconds.
If you are able to view the countdown and connected to the server, this means the configuration is correct.
Just press Enter key to save and apply the changes.
This should effectively configure the IPv4 from DHCP to Static and to test if the network is still up.
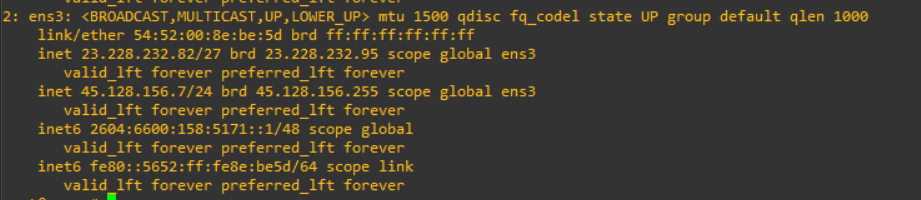
And to confirm if the additional IPs are working, run
ip aYou should get something similar to the following output:
This concludes our topic of configuring additional IPv4 on Ubuntu.
If you can not configure and facing technical difficulties, kindly reach out to us via Support Ticket.
CrownCloud - Get a SSD powered KVM VPS at $4.5/month!
Use the code WELCOME for 10% off!
1 GB RAM / 25 GB SSD / 1 CPU Core / 1 TB Bandwidth per month
Available Locations: LAX | MIA | ATL | FRA | AMS