How to Install Glances on Debian 11
Glances is a cross-platform monitoring tool that aims to present a large amount of monitoring information through a curses or Web-based interface.
Features
- CPU related information such as idle, iowait, usage, and more
- Memory-related information such as usage, free, SWAP, and more.
- Network usage information based on interfaces.
- Disk usage information.
- Lists processes resources used (sortable by resources).
Update Debian 11 bullseye
apt update && apt -y upgrade Install the Required Packages
apt install python3 python3-dev python3-jinja2 python3-psutil python3-setuptools hddtemp python3-pip lm-sensorsOutput:
root@server:~# apt install python3 python3-dev python3-jinja2 python3-psutil python3-setuptools hddtemp python3-pip lm-sensors
Reading package lists... Done
Building dependency tree... Done
Reading state information... Done
hddtemp is already the newest version (0.3-beta15-54).
python3-jinja2 is already the newest version (2.11.3-1).
lm-sensors is already the newest version (1:3.6.0-7).
python3-pip is already the newest version (20.3.4-4).
python3-psutil is already the newest version (5.8.0-1).
python3 is already the newest version (3.9.2-3).
python3-dev is already the newest version (3.9.2-3).
python3-setuptools is already the newest version (52.0.0-4)
Install Glances
Run the below command to install Glances,
pip3 install glancesOutput:
root@server:~# pip3 install glances
Collecting glances
Downloading Glances-3.2.2-py3-none-any.whl (1.5 MB)|| 10 kB 18.9 MB/s eta|▍| 20 kB 20.8 MB/s eta|▋| 30 kB 23.2 MB/s       eta|▉  40 kB 21.5 MB/s eta|█ | 51 kB 23.6 MB/s eta|█▎| 61 kB 23.3 MB/s eta|█▌| 71 kB 25.5 MB/s eta|█▊| 81 kB 28.1         MB/s eta
Note: Python headers are required to install psutil.
For example, on Debian/Ubuntu you need to install first the python-dev package.
You can also install the following libraries to use optional features (like the Web interface, export modules…):
pip3 install glances[all]Upgrade Glances and all its dependencies to the latest versions:
pip3 install --upgrade glances
pip3 install --upgrade psutil
pip3 install --upgrade glances[all]
Output:
root@server:~# pip3 install --upgrade glances[all]
Requirement already satisfied: glances[all] in /usr/local/lib/python3.9/dist-packages (3.2.2)
Collecting glances[all]
Using cached Glances-3.2.2-py3-none-any.whl (1.5 MB)
Using cached Glances-3.2.1-py3-none-any.whl (1.5 MB)
Requirement already satisfied: psutil>=5.3.0 in /usr/local/lib/python3.9/dist-packages (from glances[all]) (5.8.0)
Requirement already satisfied: defusedxml in /usr/local/lib/python3.9/dist-packages (from glances[all]) (0.7.1)
Requirement already satisfied: future in /usr/local/lib/python3.9/dist-packages (from glances[all]) (0.18.2)
Allowing Glances by Port Number
Note: Following command will work if you have enabled ufw firewall else please allow the port 61208 to access the Glances in Web Mode
ufw allow 61208After installing Glances you can use this tool in 3 modes.
- Standalone – To monitor a single system and view results in the terminal.
- Web – To monitor a single system and view results in web UI.
- Client-Server – To monitor multiple systems.
Run Glances in Standalone Mode
If you want to monitor your local machine, open a console/terminal and simply run:
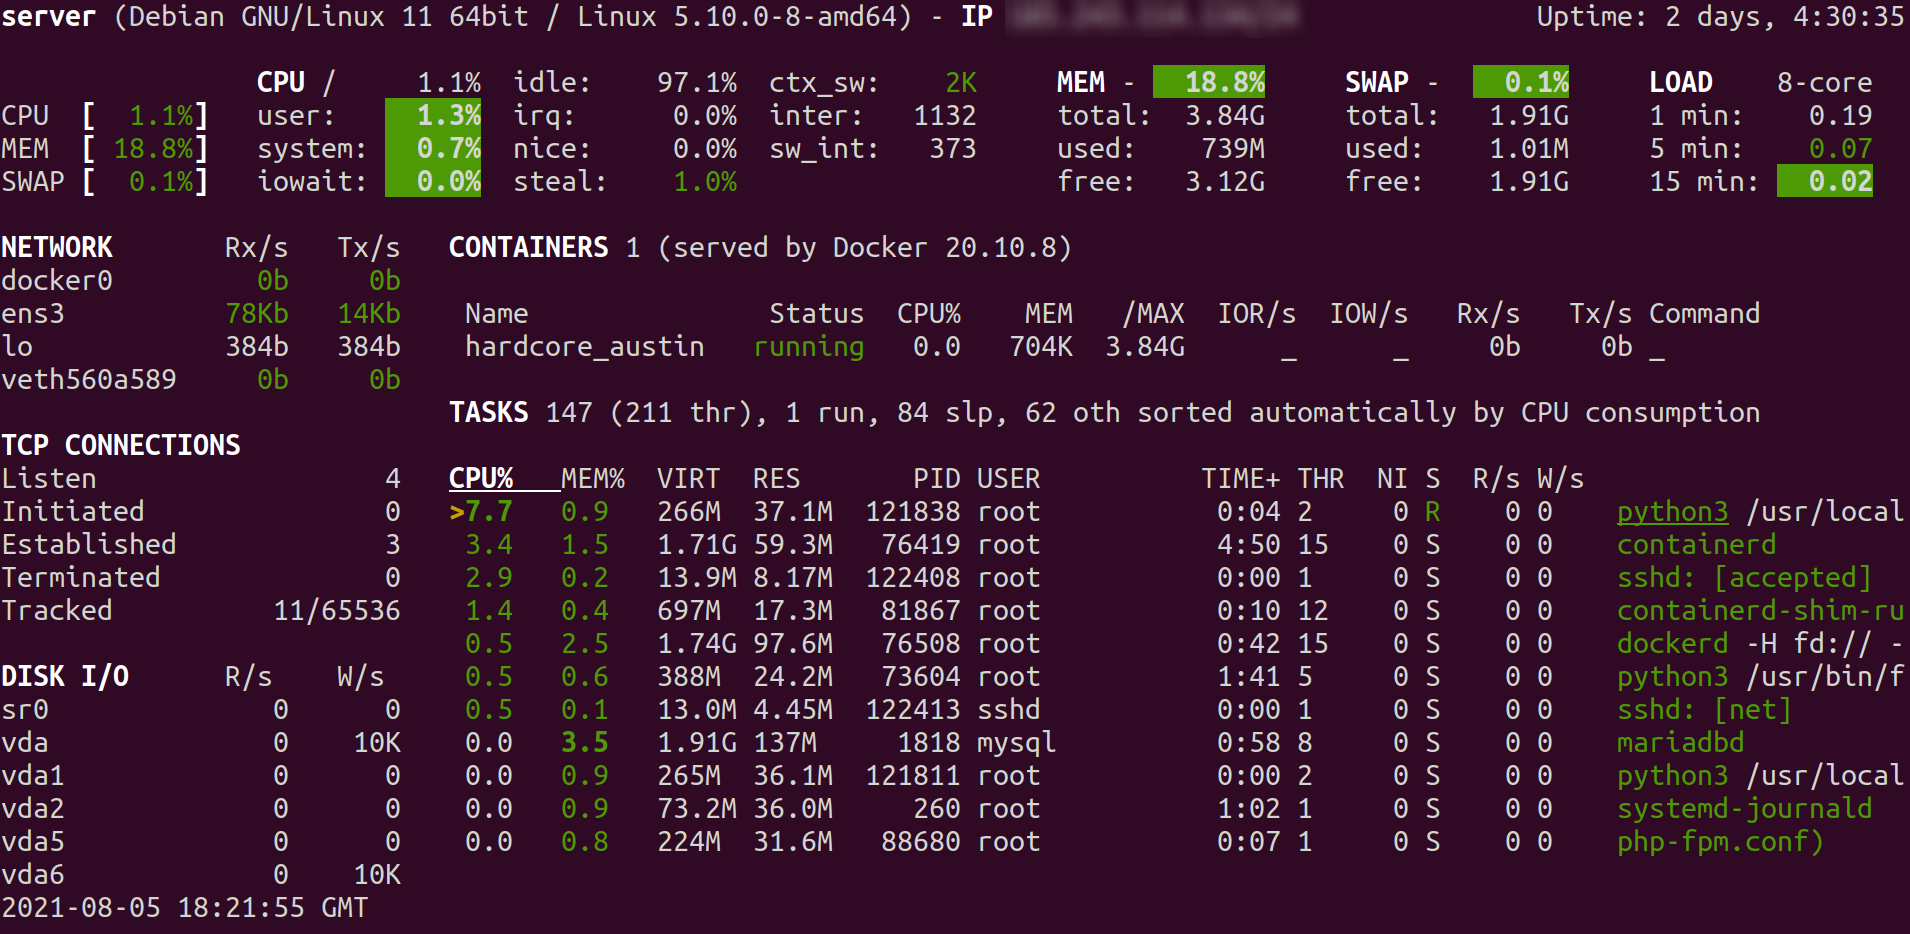
glancesYou will see the output something like below:
Run Glances in Web Mode
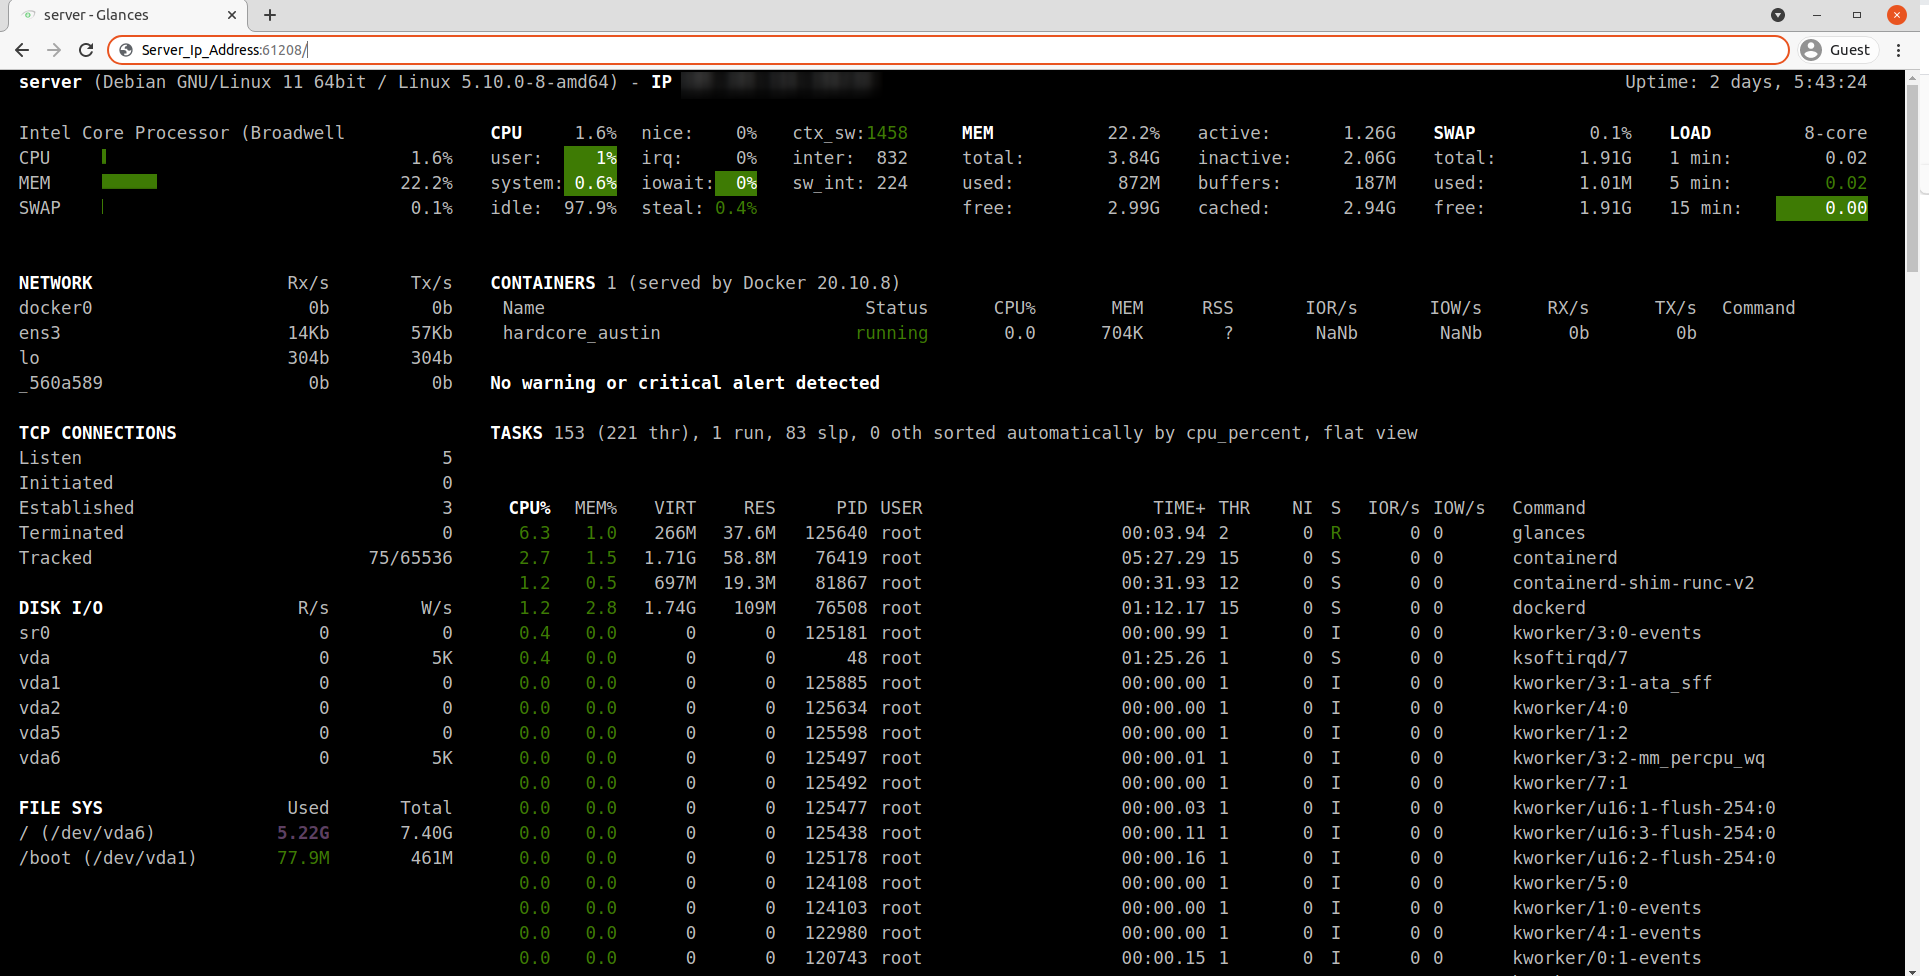
If you want to remotely monitor a machine, called a server, from any device with a web browser, just run the server with the -w option:
glances -wOutput:
root@server:~# glances -w
Glances Web User Interface started on http://0.0.0.0:61208/
Now your system in web browsers using IP or FQDN on port 61208.
Web mode will only be active if the above command is running.
You can quit the web mode by stopping the web mode with Ctrl + C.
Run Glances in Client-Server Mode
In Client-Server mode, you can monitor multiple clients from the main server. For this, you will have to install Glances on all the clients you intend to monitor and allow the port in the firewall. The procedure remains the same as mentioned above.
Client-Side
apt update && apt -y upgrade
apt install python3 python3-dev python3-jinja2 python3-psutil python3-setuptools hddtemp python3-pip lm-sensors
pip3 install glances[all]
ufw allow 61208
This is to access each server data from your local system by connecting this to its client. You must have Glances installed on each system you need to monitor and also on the main server system.
Now login to each remote system to start Glances in server mode.
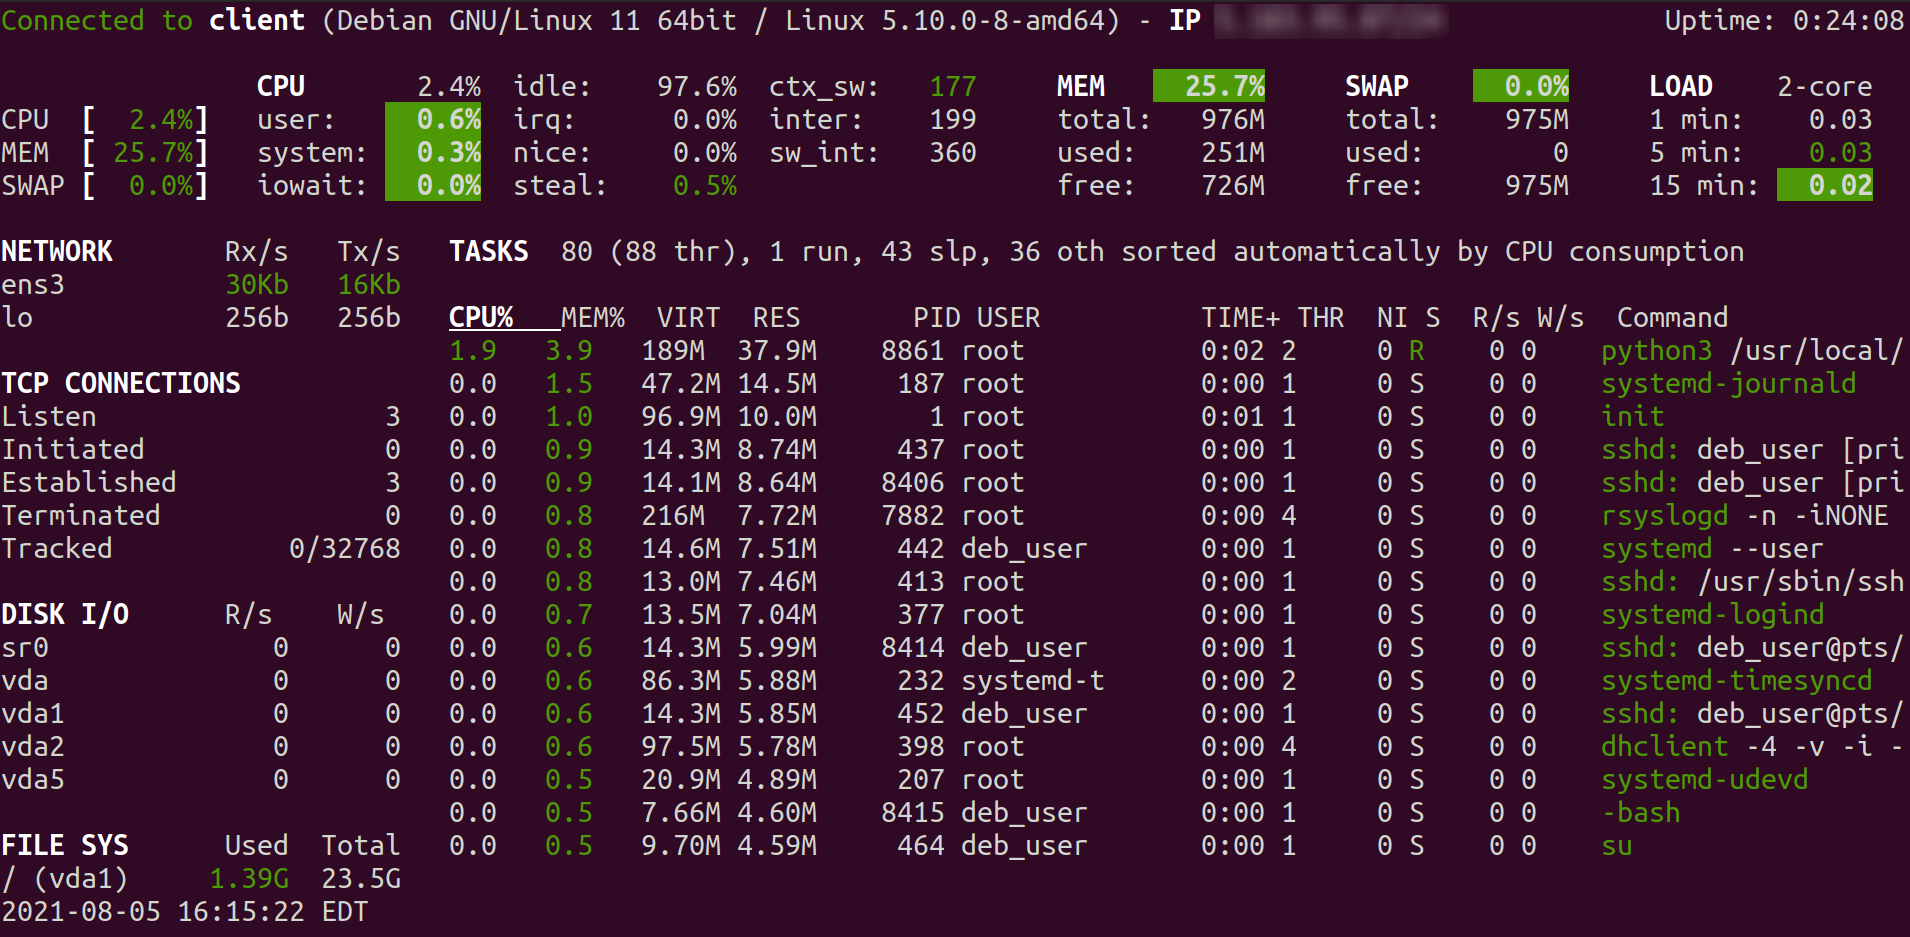
root@client:~# glances -sOutput:
root@client:~# glances -s
Glances XML-RPC server is running on 0.0.0.0:61209
Announce the Glances server on the LAN
After starting Glances in server mode on each Linux system. Go to your main server and connect to the Glances system with an IP address. Use the following command to access the Glances of the client.
root@server:~# glances -c 192.168.10.100Change 192.168.10.100 with remote system IP. Also, make sure to open the Glances port on a remote system.
This will show you the resource utilization of the remote system.
CrownCloud - Get a SSD powered KVM VPS at $4.5/month!
Use the code WELCOME for 10% off!
1 GB RAM / 25 GB SSD / 1 CPU Core / 1 TB Bandwidth per month
Available Locations: LAX | MIA | ATL | FRA | AMS